Handle and trigger events
When a website is called up and various actions are performed there, various events are triggered in the background. Within the JavaScript code, it is possible to react to the events. This principle is called event-driven programming.
1. Concept of event-driven programming
The concept of event-driven programming is also used in other programming languages. On the one hand, there are so-called triggers (event emitters). In the case of UIs, these can be buttons, text fields or other UI components. As soon as a button is clicked or text is entered in a text field, an event is triggered in the background.
After an event has been triggered, it is queued in a so-called event queue, which ensures that events that were triggered first are also handled first. The so-called event loop is used to continuously check whether there is a new event in the event queue, and if this is the case, the corresponding event is forwarded to so-called event handlers.
In JavaScript, event handlers are simple functions that allow you to react to the triggered event. So when a certain button is clicked, that function should be called. There are also events in JavaScript that are triggered without a user interacting with the user interface; these are then triggered programmatically, but these are server-side applications that can be created with Node.js.
2. React to events
Three steps are necessary to be able to trigger a function during user interactions within a function:
- Selection of the element that is to react to the user interaction, i.e. if the user clicks on a button, the corresponding <button> element must first be selected.
- Specification of the event to be intercepted. There are many types of events, such as mouse clicks, keystrokes, mouse movements and more.
- Specification of the function to be called. Here you define the function that is to be called when the corresponding event occurs on the selected element, e.g. should data be sorted or deleted when clicking in a table?
There are three ways in which events can be intercepted or elements bound and how the code that is executed when an event is triggered should be defined:
- HTML event handler: Here, s pecial HTML attributes are used to define which function is to be called for which event. However, this option is hardly used today or should no longer be used, as HTML and JavaScript code are mixed, and this is not good style in terms of maintainability etc..
- DOM event handlers: These are part of the DOM specification and are defined via JavaScript. The advantage here is that HTML and JavaScript are separated from each other, but the disadvantage is that it is only possible to specify a single function to be called for an event.
- DOM event listeners: These were introduced in 2000 and since then have been the standard way for event handling to react to events. The advantage here is that several event listeners can be registered for the same event.
When an event occurs, the system checks whether an event handler or event listener is defined for the event. If this is the case, the corresponding code is executed. If, on the other hand, no event handler or event listener is defined, the standard actions of the browser that are linked to the respective event are triggered directly. Within an event handler or event listener, you also have the option of preventing these standard browser actions for an event.
2.1. Define event handler via HTML
HTML event handlers are defined within the HTML code via HTML attributes. The HTML attributes always have the name of the event plus a preceding on. In the next example, we want to check whether a negative value has been entered in a form field. For the example, the HTML attribute is then onblur, because the event blur is triggered when form elements are exited. The function that is to be called when the event is triggered is then used as the value for the attribute. If the function is called checkAge, this results in the following HTML attribute:
onblur = "checkAge()"
The complete HTML code looks like this:
Complete Code - Examples/Part_278/...
 <body>
   <div>
     <label for="age"></label>
     <input id="age" type="number" value="0" onblur="checkAge()"/>
   </div>
   <div id="output"></div>
   <script>
     function checkAge() {
         const output = document.getElementById('output');               // Container for message
         const element = document.getElementById('age');                 // Age input field
         const age = element.value;                                      // Current age value
         if(age < 0) {                                                   // If value is negative ...
             output.textContent = 'Age cannot be negative.';             // ... output message ...
         } else {                                                        // ... otherwise ...
             output.textContent = '';                                    // ... delete message.
         }
     }
  </script>
 </body>
Here, the input field and container are first determined using their ID and each assigned to a variable. The value of the input field is then read and checked. If the value is less than 0, a corresponding error message is written to the container. If the value is equal to 0 or greater, the text content of the container is emptied.

If the validation should not be triggered as soon as the input field is left, but only at the press of a button, for example, the example from just now can be adapted relatively easily:
 <input id="age" type="number" value="0"/>
 <input type="submit" value="Check age" onclick="checkAge()"/>
Here, the event handler for the blur event has been removed from the text field and an additional button has been inserted, on which in turn the event handler for the click event has been defined, which is triggered as soon as the corresponding button is clicked.
The complete HTML code looks like this:
Complete Code - Examples/Part_279/...
 <body>
   <div>
     <label for="age"></label>
     <input id="age" type="number" value="0"/>
     <input type="submit" value="Check age" onclick="checkAge()"/>
   </div>
   <div id="output"></div>
   <script>
     function checkAge() {
       const output = document.getElementById('output');           // Container for message
       const element = document.getElementById('age');             // Age input field
       const age = element.value;                                  // Current age value
       if(age < 0) {                                               // If value is negative ...
         output.textContent = 'Age cannot be negative.';           // ... output message ...
       } else {                                                    // ... otherwise ...
         output.textContent = '';                                  // ... delete message.
       }
     }
   </script>
 </body>

2.2. Define an event handler via JavaScript
The HTML code and JavaScript code are not mixed in the DOM event handler. Which element should result in which function being called for which event is defined in the JavaScript code.
When using DOM event handlers, the HTML remains free of JavaScript code:
Complete Code - Examples/Part_280/...index.html:
 <body>
   <div>
     <label for="age"></label>
     <input id="age" type="number" value="0"/>
   </div>
   <div id="output"></div>
   <script src="script.js"></script>
 </body>
script.js:
 function checkAge() {
     const output = document.getElementById('output');           // Container for message
     const element = document.getElementById('age');             // Age input field
     const age = element.value;                                  // Current age value
     if(age < 0) {                                               // If value is negative ...
       output.textContent = 'Age cannot be negative.';           // ... output message ...
     } else {                                                    // ... otherwise ...
       output.textContent = '';                                  // ... delete message.
     }
   }

 // Definition of a DOM event handler
   function init() {
     const element = document.getElementById('age');     // (1) Get element
     element.onblur =                                    // (2) Define event
     checkAge;                                           // (3) Define event handler
   }

   window.onload = init;
First, the input field for which the event handler is to be defined is determined again using the ID. The name of the function to be called is defined for the onblur property of this object. Please note that, unlike the HTML event handlers, there is no function call, only the name of the function, i.e. in this case element.onblur = checkAge (not element.onblur = checkAge(), without a pair of brackets!). In addition, the onload property of the window object is used to define an event handler that is called when the web page is loaded. Without this event handler, the init() function would not be called and therefore no event handler would be registered on the form element.

The disadvantage of DOM event handlers is that only one event handler can be defined per event on an element. If you want to extend the above example so that not only one function is called, but also another function that checks whether the entered value is a number at all (here checkAgeIsNumber()), this would not be so easy:
 function init() {
   const element = document.getElementById('age');
   element.onblur = checkAge;
   element.onblur = checkAgeIsNumber;    // the event handler is overwritten here
 }

 window.onload = init;
Here, the checkAge() function is first defined as an event handler for the onblur property, followed by the checkAgeIsNumber() function. However, this only ensures that the onblur property is reset and the checkAge value is overwritten. This means that only the checkAgeIsNumber function is called, but not the checkAge function.
In this example, the problem can be solved with an anonymous function. The two functions checkAge and checkAgeIsNumber are simply encapsulated here within such an anonymous function, which in turn is then defined as an event handler:
 ...
 function init() {
   const element = document.getElementById('age');
     element.onblur = function () {      // anoymous function
       checkAge();                       // ... in which both the one...
       checkAgeIsNumber();               // ... as well as the other function...
     }                                   // ... is called
 }

 window.onload = init;
Even if this example works, you should define functions as event listers rather than event handlers if possible. The next section shows how this works.
2.3. Define event listeners
The disadvantages of the event handler do not apply to the event listener and the associated addEventListener() method. This expects the name of the event to be reacted to as a parameter, as well as the event listener, i.e. the function that is to be called when the event occurs. Optionally, a third parameter can be specified, which can be used to influence the so-called event flow.
Complete Code - Examples/Part_281/...
 <body>
   <div>
     <label for="age"></label>
     <input id="age" type="number" value="0"/>
   </div>
   <div id="output"></div>
   <script>
 function checkAge() {
     const output = document.getElementById('output');           // Container for message
     const element = document.getElementById('age');             // Age input field
     const age = element.value;                                  // Current value age
     if(age < 0) {                                               // If value is negative ...
       output.textContent = 'Age cannot be negative.';           // ... output message ...
     } else {                                                    // ... otherwise ...
       output.textContent = '';                                  // ... delete message.
     }
   }

   function init() {
     const element = document.getElementById('age');             // Get element
     element.addEventListener(                                   // Register event listener
       'blur',                                                   // Name of the event
       checkAge,                                                 // Name of the event listener
       false                                                     // Event flow
     );
   }

   document.addEventListener('DOMContentLoaded', init);
   </script>
 </body>
This example has the same effect as the previous example, namely calling the checkAge() function when leaving the corresponding form field to enter the age. The value blur is passed as the first parameter and the name of the function checkAge() as the second parameter.

2.4. Define multiple event listeners
Using the addEventListener() method, it is also possible to register several functions for one and the same event. This would only be possible with event handlers using an anonymous function.
Complete Code - Examples/Part_282/...
 <body>
   <div>
     <label for="age"></label>
     <input id="age" type="number" value="0"/>
   </div>
   <div id="output"></div>
   <script>
 function checkAge() {
     const element = document.getElementById('age');     // Age input field
     const age = element.value;                          // Current age value
     if(age < 0) {                                       // If value is negative ...
       showMessage('Age cannot be negative.');           // ... issue warning ...
     }
   }

 function checkAgeIsNumber() {
     const element = document.getElementById('age');     // Input field age
     const age = element.value;                          // Current age value
     if(!(!isNaN(parseFloat(age)) && isFinite(age))) {   // If value is number ...
       showMessage('Age must be number.');               // ... output message.
     }
   }

 function clearMessage() {
     showMessage('');
   }

 function showMessage(message) {
     const output = document.getElementById('output');
     output.textContent = message;
   }

 function init() {
     const element = document.getElementById('age');     // Get element
     element.addEventListener(                           // Register event listener
       'blur',                                           // Name of the event
       clearMessage                                      // Name of the event listener
     );
     element.addEventListener(                           // Register event listener
       'blur',                                           // Name of the event
       checkAge                                          // Name of the event listener
     );
     element.addEventListener(                           // Register event listener
       'blur',                                           // Name of the event
       checkAgeIsNumber                                  // Name of the event listener
     );
   }

 document.addEventListener('DOMContentLoaded', init);
   </script>
 </body>
Here, three different functions have been registered as event listeners for the event blur on the corresponding form field. The clearMessage() function ensures that the message is cleared. The checkAge() function checks that the age is not negative, and checkAgeIsNumber() ensures that the value entered is a number.


The use of event listeners or the addEventListener() method is much more flexible than event handlers, as not only a single function can be specified, but any number of functions.
2.5. Pass arguments to event listeners
Sometimes it may be necessary to pass arguments to the function that is registered as an event listener. This is not so easy at first, because the function addEventListener() is legally passed the function itself. But it is possible with the help of anonymous functions:
Complete Code - Examples/Part_283/...
       <body>
   <div>
     <label for="age"></label>
     <input id="age" type="number" value="0"/>
   </div>
   <div id="output"></div>
   <script>
 function checkAge(age) {
     if(age < 0) {
       showMessage('Age cannot be negative.');
     }
   }

   function checkAgeIsNumber(age) {
     if(!(!isNaN(parseFloat(age)) && isFinite(age))) {
       showMessage('Age must be a number.');
     }
   }

   function clearMessage() {
     showMessage('');
   }

   function showMessage(message) {
     const output = document.getElementById('output');
     output.textContent = message;
   }

   function getAge() {
     const element = document.getElementById('age');
     const age = element.value;
     return age;
   }

   function init() {
     const element = document.getElementById('age');
     element.addEventListener(
       'blur',
       clearMessage
     );
     element.addEventListener(
       'blur',
       function() {                          // Anonymous function
         const age = getAge();               // Get value for age
         checkAge(age);                      // Call the actual function
       }
     );
     element.addEventListener(
       'blur',
       function() {                          // Anonymous function
         const age = getAge();               // Get value for age
         checkAgeIsNumber(age);              // Call the actual function
       }
     );
   }

   document.addEventListener('DOMContentLoaded', init);
   </script>
 </body>
Here, the functions checkAge() and checkAgeIsNumber() expect a numerical value as a parameter, which is checked. This makes both functions much more reusable than in the previous example, as they no longer access the DOM tree directly and can in principle also be used in a different context. The code for accessing the DOM tree or the form field has now also been outsourced to the new getAge() function. Within the event listeners, the value returned by getAge() is then passed to the two check methods.


The same example would look like this with an Arrow function:
 ...

 element.addEventListener(
     'blur',
     () => {
         const age = getAge();
         checkAge(age);
     }
 );

 element.addEventListener(
     'blur',
     () => {
         const age = getAge();
         checkAgeIsNumber(age);
     }
 );

 document.addEventListener('DOMContentLoaded', init);
2.6. Remove event listeners
Event listeners that have been added to an element for an event can also be removed again. This is possible with the removeEventListener() method. The name of the event and the event listener to be removed are passed as parameters.
Complete Code - Examples/Part_284/...
 ...
 function init() {
   const element = document.getElementById('age');         // Get element
   element.addEventListener(                               // Register event listener
     'blur',                                               // Name of the event
     clearMessage                                          // Name of the event listener
   );
   element.addEventListener(                               // Register event listener
     'blur',                                               // Name of the event
     checkAge                                              // Name of the event listener
   );
   element.addEventListener(                               // Register event listener
     'blur',                                               // Name of the event
     checkAgeIsNumber                                      // Name of the event listener
   );
   const checkBox = document.getElementById('validation');
   checkBox.addEventListener('change', function() {
     if(checkBox.checked) {
       element.addEventListener('blur', checkAge);
       element.addEventListener('blur', checkAgeIsNumber);
     } else {
       clearMessage();
       element.removeEventListener('blur', checkAge);
       element.removeEventListener('blur', checkAgeIsNumber);
     }
   });
 }

 document.addEventListener('DOMContentLoaded', init);
In this example, a checkbox has been added that can be used to deactivate and activate the validation. For this purpose, an event listener for the change event was added to the checkbox and the checked property is then used within this event listener to check whether the checkbox is activated or deactivated. If the checkbox is active, the event listeners checkAge() and checkAgeIsNumber() are added; if the checkbox is deactivated, they are removed using the removeEventListener() method.


2.7. Define event handler and event listener via helper function
If you want to support as many browsers as possible, but do not want to access a library (e.g. jQuery), you can use the addEvent() helper function. The method expects three parameters: the element on which the event listener is to be added, the event to which it is to react and the function that is to be registered.
Helper function for defining event listeners or event handlers:
Complete Code - Examples/Part_285/...
 ...
 function addEvent(element, eventType, eventHandler) {
   if (window.addEventListener) {
     element.addEventListener(eventType, eventHandler, false);
   }
   else if (window.attachEvent) {
     element.attachEvent('on' + eventType, eventHandler);
   }
   else {
     element['on' + eventType] = eventHandler;
   }
 }
Within the function, it is first checked whether the addEventListener() method exists; this is usually checked on the window object. If this is the case, the function is registered as an event listener via this method. If the method does not exist, it is checked in the same way whether the attachEvent() method exists (this is a proprietary method of Internet Explorer, as older versions do not support the addEventListener() method), and if this method exists, the function is registered via the method. However, if the attachEvent() method does not exist either, the function is registered as an event handler.

2.8. Access information about an event
With event handlers or event listeners that are registered within a function, it is possible to access certain information about the triggered event. This is done via a parameter that is passed when the corresponding function is called. Each event is represented by a specific object type, e.g. for mouse events by the object type MouseEvent or keyboard events by the object type KeyboardEvent. All these object types have a common type from which they are derived, namely the type Event.
These are the properties that are provided by this type:
| Property | Description |
|---|---|
| bubbles | Contains an indication of whether an event ascends in the DOM tree or not. |
| cancelable | Contains an indication of whether an event can be canceled or not. |
| currentTarget | Contains a reference to the current destination of the event. |
| defaultPrevented | Contains an indication of whether the preventDefault() method was called on the event or not. |
| eventPhase | Contains a numerical value that represents the current phase in which the event is currently located: 0 - Event.NONE; 1 - Event.CAPTURING_PHASE; 2 - Event.AT_TARGET; 3 - Event.BUBBLING_PHASE. |
| target | Contains a reference to the original destination of the event. |
| timeStamp | Contains the time at which the event was triggered. |
| type | Contains the name of the event. |
| isTrusted | Indicates whether the event was triggered by the browser (e.g. by clicking on a button) or by the JavaScript code. |
The individual object types such as MouseEvent and KeyboardEvent also provide additional properties.
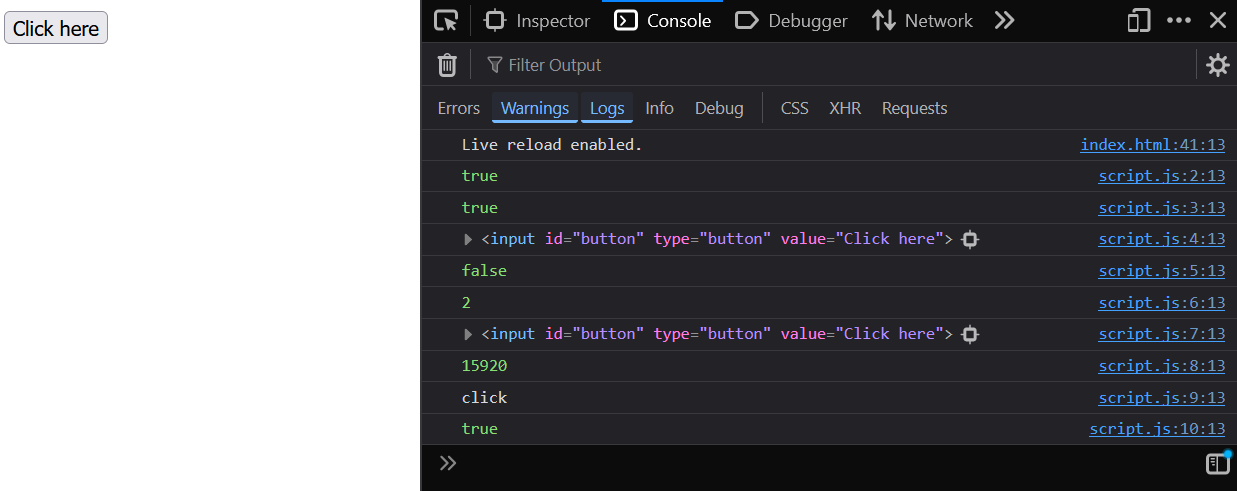
Complete Code - Examples/Part_286/...
 <body>
   <div>
     <input id="button" type="button" value="Click here" />
   </div>
   <div id="output"></div>
   <script>
 function buttonClicked(event) {
     console.log(event.bubbles);           // true
     console.log(event.cancelable);        // true
     console.log(event.currentTarget);     // <input>
     console.log(event.defaultPrevented);  // false
     console.log(event.eventPhase);        // 2
     console.log(event.target);            // <input>
     console.log(event.timeStamp);         // e.g. 145323
     console.log(event.type);              // "click"
     console.log(event.isTrusted);         // true
   }

   function init() {
     const element = document.getElementById('button');      // Get button
     element.addEventListener(                               // Register event listener
       'click',                                              // Name of the event
       buttonClicked,                                        // Name of the event listener
       false                                                 // Event flow
     );
   }

   document.addEventListener('DOMContentLoaded', init);
   </script>
 </body>
3. The different types of events
Different types of events can occur within a web application:
- Events for interactions with the mouse
- Events when interacting with the keyboard or text fields
- Events when working with forms
- Events when focusing on elements
- Events relating to the user interface
- Events on mobile devices
3.1. Events for interactions with the mouse
Whenever a user moves the mouse or presses the mouse buttons, an event is triggered in the background. In addition to the simple mouse clicks (click event), there is also an event for the double-click (dbclick). The mousedown and mouseup events are triggered when the mouse button is pressed or released. The mousemove event is always triggered when the mouse is moved. In addition, there are various events that are triggered depending on whether the mouse pointer is moved over or away from an element on the web page.
An overview of the interactions with the mouse:
| Property | Description |
|---|---|
| click | Is triggered when the mouse button is pressed and released over an element. |
| dbclick | Is triggered when the mouse button is pressed twice over an element. |
| contextmenu | Is triggered when a context menu is opened (usually via the right mouse button) |
| mousedown | Is triggered when the mouse button is pressed over an element. |
| mouseup | Is triggered when the mouse button is pressed over an element. |
| mousemove | Is triggered when the mouse is moved. |
| mouseover | Is triggered when the mouse is moved over an element. |
| mouseout | Is triggered when the mouse is moved away from an element. |
| mouseenter | Is triggered when the mouse is moved over an element. |
| mouseleave | Is triggered when the mouse is moved away from an element. |
The events mouseenter and mouseover as well as mouseout and mouseleave are quite similar at first glance. But mouseenter and mouseover are triggered when the mouse is moved over an element. mouseout and mouseleave are triggered when the mouse is moved away from an element. This means that mouseout and mouseleave are only triggered when the outer edge of the respective element is crossed. The same applies to mouseenter and mouseover, but only if there is another element within the respective element and the mouse is moved over it or away from the inner element.
All mouse events are of the object type MouseEvent. This type provides the following properties:
| Property | Description |
|---|---|
| altKey | Contains the Boolean information about whether the ALT key was pressed when the event was triggered. |
| button | Contains the number of the mouse button that was pressed when the event was triggered. |
| buttons | Contains a number that represents the mouse buttons that were pressed when the event was triggered. For example, the number 1 represents the left mouse button, the number 2 the right mouse button, etc. If several mouse buttons were pressed when the event was triggered, buttons contains the sum of the respective numbers. |
| clientX | The x-coordinate at which the mouse pointer is located when the event is triggered. |
| clientY | The y-coordinate at which the mouse pointer is located when the event is triggered. |
| ctrlKey | Contains the Boolean information about whether the CTRL key was pressed when the event was triggered. |
| metaKey | Contains the Boolean information on whether the so-called meta key (e.g. Windows key or cmd on macOS) was pressed when the event was triggered |
| movementX | The x-coordinate relative to the previous x-coordinate that occurred when the last mousemove event was triggered. |
| movementY | The y-coordinate relative to the previous y-coordinate that occurred when the last mousemove event was triggered. |
| region | Contains the ID of the region to which the event refers. |
| relatedTarget | Contains the target element that is thematically “related” to the current target element by the event. For example, if the mouse pointer is “dragged” away from one element and onto another element, a mouseenter event is triggered for the latter. The relatedTarget property then refers to the element from which the mouse pointer was “dragged”. |
| screenX | The x-coordinate (in relation to the screen) at which the mouse pointer is located when the event is triggered. |
| screenY | The y-coordinate (in relation to the screen) at which the mouse pointer is located when the event is triggered. |
| shiftKey | Contains the Boolean information on whether the SHIFT key was pressed when the event was triggered. |
The following example shows how a part of the browser window can be used as a drawing area using the Canvas API and the mouse and move events:
Complete Code - Examples/Part_287/...
 <head lang="en">
   <title>Drawing based on the mouse position</title>
   <style>
   body {
     margin: 0;
   }

   #container {
     position: relative;
   }

   #canvas {
     border: thin solid black;
   }
   </style>
 </head>
 <body>
   <div id="container">
     <canvas id="canvas" width="400" height="400"></canvas>
   </div>
   <script>
 function init() {
     const canvas = document.getElementById('canvas');
     canvas.addEventListener('mousemove', handleMouseMove, false);
     const context = canvas.getContext('2d');    // Get drawing area.
     let started = false;                        // Remember if path started.
     function handleMouseMove(e) {
       let x, y;
       if (e.clientX               // If the x-position is specified ...
         || e.clientX == 0) {      // ... and not 0 ...
         x = e.clientX;            // ... remember x-position ...
         y = e.clientY;            // ... remember y-position.
       }
       if (!started) {             // If path not yet started ...
         context.beginPath();      // ... Start path and ...
         context.moveTo(x, y);     // ... move to position.
         started = true;           // Notice that path has started.
       } else {                    // If path has already started ...
         context.lineTo(x, y);     // ... move to position ...
         context.stroke();         // ... and draw connection.
       }
     }

   }

   document.addEventListener('DOMContentLoaded', init);
   </script>
 </body>
The <canvas> element in the HTML code represents the canvas and the JavaScript code ensures that corresponding lines are drawn along the mouse movements when the mouse is moved over the canvas. The function handleMouseMove() is registered here on the drawing area as an event listener for the mousemove event. As soon as the mouse pointer is moved over this drawing area, this event is triggered in the background and the function handleMouseMove() is executed. This function then accesses the two properties clientX and clientY of the event object, which are specific to the MouseEvent object type. These two properties contain the x and y coordinates of the mouse pointer at the time the event was triggered. Based on this position information, the path is then drawn on the drawing area in the following part of the function.
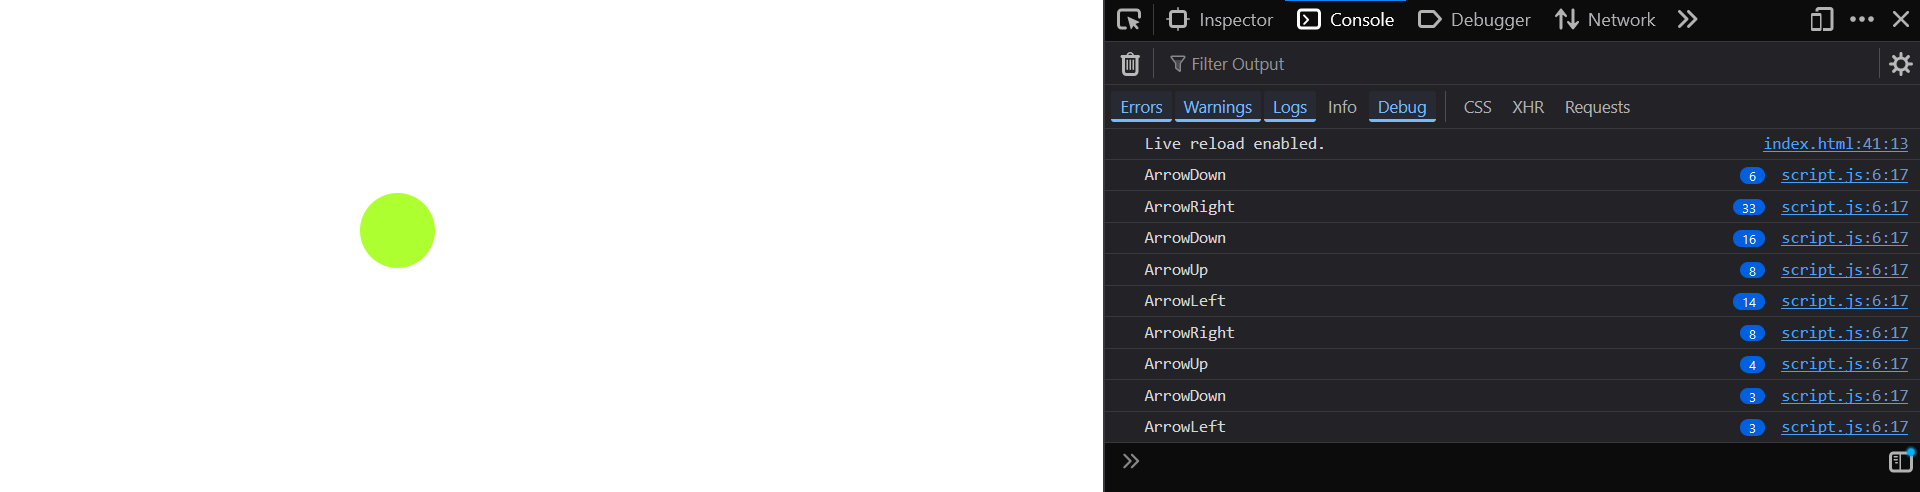
3.2. Events when interacting with the keyboard and text fields
Each time a user presses a key on the keyboard, three events are triggered: the keydown event when the respective key is pressed down, keyup when the key is released and keypress which represents the typed character (i.e. the one between keydown and keyup). The events that are triggered when interacting with the keyboard are of type KeyboardEvent.
Complete Code - Examples/Part_288/...
 <head lang="en">
   <meta charset="UTF-8">
   <title>Interception of keystrokes</title>
   <style>
   #circle {
     position: fixed;
     top: 0px;
     left: 0px;
     width: 50px;
     height: 50px;
     border-radius: 50%;
     background-color: greenyellow;
   }
   </style>
 </head>
 <body>
   <div id="container">
     <div id="circle"></div>
   </div>
 <script>
 function init() {
     window.addEventListener('keydown', (event) => {
       if (event.key !== undefined) {
         // Included in the current draft of the DOM Events API
         // Supported by Firefox and Internet Explorer, for example
         console.log(event.key);
         switch (event.key) {
           case 'ArrowUp':
             moveUp();
             break;
           case 'ArrowLeft':
             moveLeft();
             break;
           case 'ArrowRight':
             moveRight();
             break;
           case 'ArrowDown':
             moveDown();
             break;
           default: return;
         }
       } else if (event.keyIdentifier !== undefined) {
         // Included in an older draft of the DOM Events API
         // Supported by Chrome and Safari, for example
         console.log(event.keyIdentifier);
         switch (event.keyIdentifier) {
           case 'Up':
             moveUp();
             break;
           case 'Left':
             moveLeft();
             break;
           case 'Right':
             moveRight();
             break;
           case 'Down':
             moveDown();
             break;
           default: return;
         }
       } else if (event.keyCode !== undefined) {
         // Outdated
       }
     });

     const circle = document.getElementById('circle');
     const position = [0, 0];
     function move() {
       circle.style.top = position[0] + 'px';
       circle.style.left = position[1] + 'px';
     }
     function moveUp() {
       position[0] -= 10;
       move();
     }

     function moveRight() {
       position[1] += 10;
       move();
     }

     function moveLeft() {
       position[1] -= 10;
       move();
     }

     function moveDown() {
       position[0] += 10;
       move();
     }
   }

   document.addEventListener('DOMContentLoaded', init);
 </script>
 </body>
The keyboard event is intercepted here using an event listener. Within the event listener, the key pressed is determined and, depending on this, one of the methods moveUp(), moveDown(), moveRight() and moveLeft() is called. Each of these methods updates the position of the element stored in the position array and calls the move() method, which in turn updates the position of the element using CSS. The if-else statement checks whether the event object has the key property or the keyIdentifier property. key is the property that is also specified in the current DOM standard. However, this is not yet supported by all browsers, which is why the older keyIdentifier property is still used here.
3.3. Events when working with forms
Each time the user changes the text in an <input> or a <textarea> element, for example, or the selected value changes, corresponding events are triggered, as are the submission of a form or the resetting of the values contained in a form. All these events are represented by the object type Event, they do not have their own special type like mouse events or keyboard events.
| Property | Description |
|---|---|
| input | Is triggered when the value of an <input> or <textarea> element or an element with a contenteditable attribute has been changed. |
| change | Is triggered when the selected value of a selection list, a checkbox or a group of radio buttons has been changed. |
| submit | Is triggered when a form is submitted. |
| reset | Is triggered when a form has been reset (via a button) |
3.4. Events when focusing elements
Each time an element on a website receives or loses focus, for example when navigating to the element using the tab key, an element is triggered. The corresponding triggered events are object types of the type FocusEvent.
| Property | Description |
|---|---|
| focus | Is triggered when an element receives the focus. |
| blur | Is triggered when an element loses focus. |
| focusin | Is triggered when an element gains focus. In contrast to the focus event, this event rises. |
| focusout | Is triggered when an element loses focus. Unlike the blur event, this event is raised. |
An example of this can be found in section 2.1. Define event handler via HTML, where the blur property is used.
3.5. General events
In addition to the events described above, there are also other events relating to the user interface:
| Event | Description | Object type |
|---|---|---|
| load | Is triggered when the web page has finished loading. | UIEvent |
| unload | Is triggered when a new web page is requested in the corresponding browser window. | UIEvent |
| abort | Is triggered when the loading of a resource is aborted. | UIEvent |
| error | Is triggered if there is a problem loading the web page, e.g. a JavaScript error. | UIEvent |
| select | Is triggered when the text is selected on a web page. | UIEvent |
| resize | Is triggered when the size of the browser window has been changed. | UIEvent |
| scroll | Is triggered when scrolling up or down. | UIEvent |
| beforeUnload | Is triggered when a new web page is requested in the corresponding browser window. | BeforeUnloadEvent |
| DOMContentLoaded | Is triggered when the DOM tree has been fully loaded. | ClipboardEvent |
| cut | Is triggered when content is cut from a form field. | ClipboardEvent |
| copy | Is triggered when content is copied from a form field. | ClipboardEvent |
| paste | Is triggered when content is pasted from a form field. | ClipboardEvent |
| select | Is triggered when text is selected in a form field. | ClipboardEvent |
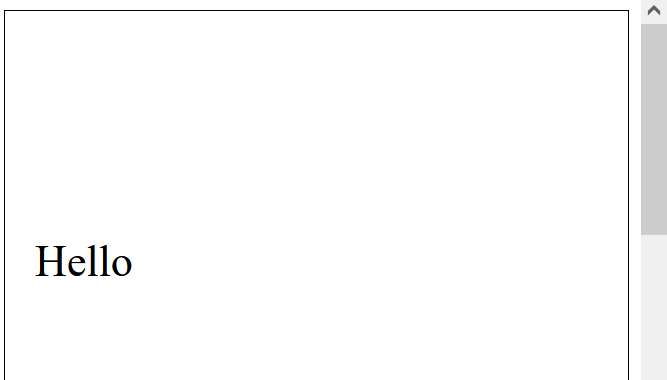
Here is a use case where the scroll event is used. The scroll event is often used today for one-page websites (a website where the entire content is contained on a single web page). If the user scrolls down, other components of the website, e.g. text or images, gradually appear:
Complete Code - Examples/Part_289/...
<style>
#content {
height: 2000px;
border: thin solid black;
padding-left: 20px;
padding-top: 150px;
font-size: 22pt;
}
.hide {
opacity: 0;
}
.show {
animation: fadein 2s;
}
@keyframes fadein {
from { opacity: 0; }
to { opacity: 1; }
}
</style>
</head>
<body>
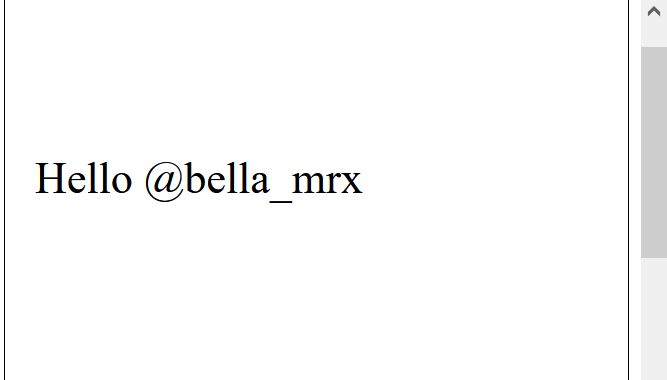
<div id="content">
Hello
<span id="name" class="hide">@bella_mrx</span>
</div>
<script>
function init() {
let scrollPosition = window.scrollY;
const nameElement = document.getElementById('name');
function handleScrollEvent(e) {
scrollPosition = window.scrollY;
if(scrollPosition > 10) {
nameElement.classList.remove('hide');
nameElement.classList.add('show');
}
else {
nameElement.classList.remove('show');
nameElement.classList.add('hide');
}
}
window.addEventListener('scroll', handleScrollEvent);
}
document.addEventListener('DOMContentLoaded', init);
</script>
</body>
The element with the ID name, which contains the text @bella_mrx, is initially hidden when the web page is loaded. When the web page is loaded, an event listener handleScrollEvent() is registered for the scroll event on the window object. Within this event listener, the vertical scroll position is determined via window.scrollY. If this scroll position has exceeded a certain threshold value (here the value 10), the CSS class hide is removed from the hidden <span> element and replaced by the CSS class show.
3.6. Events on mobile devices
A number of other events are also triggered when using mobile devices such as tablets or smartphones. This is due to the fact that mobile devices can be operated very differently to conventional laptops or desktop computers. Fingers or special input pens are generally used instead of a mouse and keyboard to interact with the relevant website. Other factors also play a role with mobile devices, such as the tilt or orientation (tilted sideways or tilted forwards or backwards, etc.) of the device. For these forms of interaction, which are very much designed for touching the display, there are corresponding events to detect and react to touches on the display of the end device:
| Event | Description | Object type |
|---|---|---|
| orientationchange | Is triggered when the orientation of the input device changes. | Event |
| deviceorientation | Is triggered when new data regarding the orientation of the end device is available. | DeviceOrientationEvent |
| devicemotion | Is triggered at regular intervals and then indicates the acceleration force acting on the end device. | DeviceMotionEvent |
| touchstart | Is triggered when the end device, usually a finger, touches the display. | TouchEvent |
| touchend | Is triggered when the input device ends the touch, i.e. when the finger is removed from the display. | TouchEvent |
| touchmove | Is triggered when the input device is moved across the display. | TouchEvent |
| touchcanel | Is triggered when touch tracking has been interrupted. | TouchEvent |
This example works similarly to Part_288 only instead of the keyboard, the circle is moved by touch (i.e. only by hand). This example only works if the device supports touch events, i.e. has a touch screen:
Complete Code - Examples/Part_290/...
   <head lang="en">
   <meta charset="UTF-8">
   <title>Touchevents</title>
   <style>
     #circle {
       position: fixed;
       top: 0px;
       left: 0px;
       width: 50px;
       height: 50px;
       border-radius: 50%;
       background-color: greenyellow;
       touch-action: none; /* Prevent default touch behavior */
     }
   </style>
 </head>
 <body>
   <div id="container">
     <div id="circle"></div>
   </div>
 <script>
 function init() {
     const circle = document.getElementById('circle');
     let isDragging = false;
     let offsetX = 0;
     let offsetY = 0;

     // Start dragging when the circle is touched
     circle.addEventListener('touchstart', function(event) {
       isDragging = true;
       const touch = event.touches[0];
       const circleRect = circle.getBoundingClientRect();

       // Calculate offset from the top-left corner of the circle
       offsetX = touch.clientX - circleRect.left;
       offsetY = touch.clientY - circleRect.top;
     });

     // Move the circle as the finger moves
     window.addEventListener('touchmove', function(event) {
       if (isDragging) {
         const touch = event.touches[0];
         const newLeft = touch.clientX - offsetX;
         const newTop = touch.clientY - offsetY;

         // Set the new position of the circle
         circle.style.left = newLeft + 'px';
         circle.style.top = newTop + 'px';
       }
     });

     // Stop dragging when the touch ends
     window.addEventListener('touchend', function(event) {
       isDragging = false;
     });

     // Prevent default touch behavior to avoid interference with dragging
     circle.addEventListener('touchmove', function(event) {
       event.preventDefault();
     });
   }

   document.addEventListener('DOMContentLoaded', init);
 </script>
 </body>
In the touchstart event, the circle starts to move when the user taps it. The event calculates the offset between the position of the finger and the top left corner of the circle to ensure that the circle moves smoothly relative to the original touch point. The touchmove event is triggered when the user drags their finger, the circle follows and moves exactly to the position of the finger minus the calculated offset. This keeps the circle centered around the point where the user originally touched it. The touchend event is triggered when the user lifts their finger, the dragging stops and the circle remains in its current position. The CSS rule touch-action: none; disables the default touch behavior (such as scrolling or zooming) for the circle and ensures smooth dragging without interference.

4. Influence the flow of events
Whenever an event is triggered, it goes through several event phases. It is important to understand what these phases are and how they relate to the triggering of events.
4.1. The event phases
In the event flow, a distinction is first made between the following three phases:
- Capturing phase: In this phase, the event “descends” starting from the top node in the dome tree down to the element for which the event was triggered, the target element.
- Target phase: In this phase, the event is triggered at the target element.
- Bubbling phase: In this phase, the result “climbs” from the target element in the DOM tree back up to the document node.
During the capturing phase and the bubbling phase, the event triggers the event handlers or event listeners in sequence that were registered for this event at the respective element where the event is currently located. If an event is triggered, it first goes through the capturing phase, which executes all event handlers/event listeners that have been registered for this phase, then it goes into the target phase, in which the event handlers/event listeners that have been registered for the target element are executed, and then it goes through the bubbling phase, in which all event handlers/event listeners that have been registered for the phase are executed.
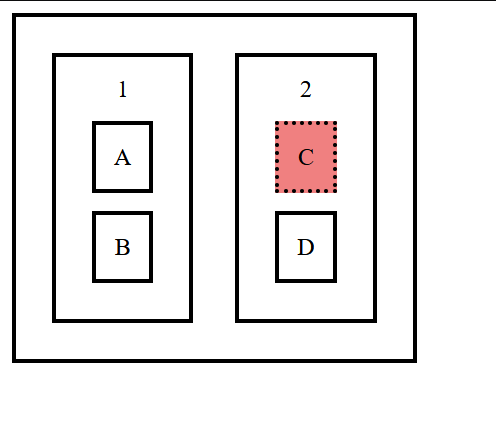
Here is an example to demonstrate the principle of event bubbling:
Complete Code - Examples/Part_291/...
<head lang="en">
<meta charset="UTF-8">
<title>Event-Capturing und Event-Bubbling</title>
<style>
body {
display: table;
}
.level1, .level2, .level3 {
margin: 12px;
padding: 12px;
border: 3px solid black;
background-color: white;
}
.level1 {
display: table-cell;
text-align: center;
vertical-align: middle;
}
.level2 {
display: inline-block;
}
.selected {
background-color: lightcoral;
}
</style>
</head>
<body>
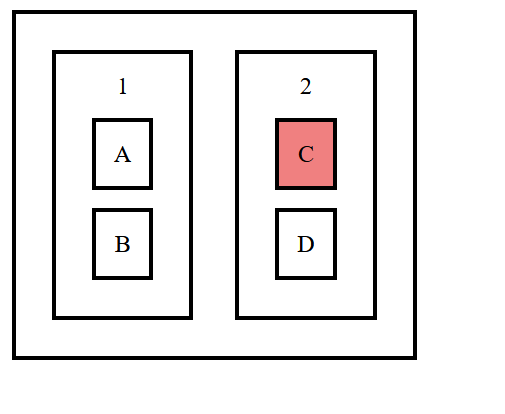
<div id="outer" class="level1">
<div id="first" class="level2">
1
<div id="A" class="level3">A</div>
<div id="B" class="level3">B</div>
</div>
<div id="second" class="level2">
2
<div id="C" class="level3">C</div>
<div id="D" class="level3">D</div>
</div>
</div>
<script>
function handler(ev) {
const e = ev || window.event; // Get event
const target = e.target || e.srcElement; // Target element
this.classList.toggle('selected'); // CSS class
console.log( // Output clicked ...
`Clicked on node with ID "${target.id}"` // ... element.
);
console.log( // Output current ...
`Event at node with ID "${this.id}"` // ... element.
);
}
function init() {
const elements = document.querySelectorAll( // All elements ...
'.level1, ' + // ... of the first, ...
'.level2, ' + // ... of the second ...
'.level3' // ... and the third ...
); // ... level ...
for(let i=0; i<elements.length; i++) { // ... receive an
elements[i].addEventListener( // ... listener for the ...
'click', // ... click event.
handler
);
}
}
document.addEventListener('DOMContentLoaded', init);
</script>
</body>
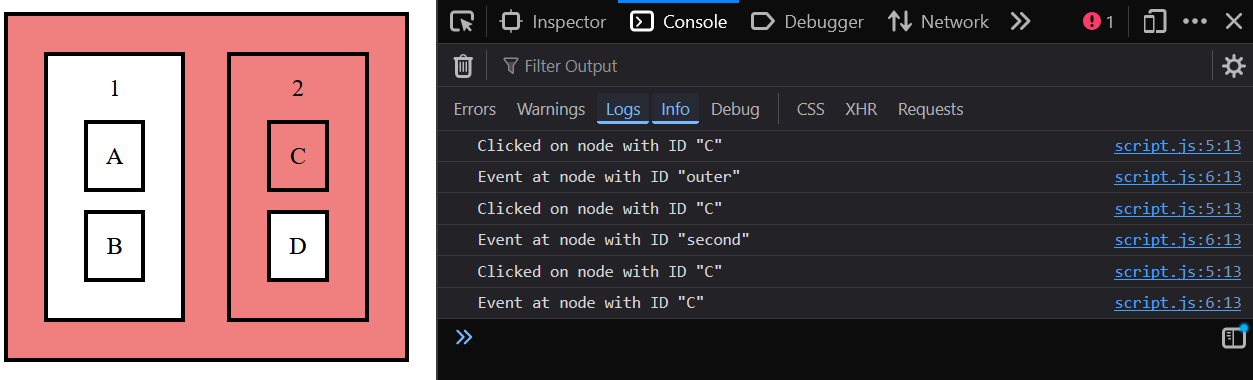
Starting point:
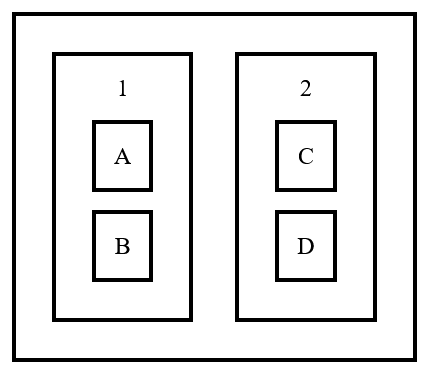
In the JavaScript code, the same function is now added to each of these <div> elements as an event listener. This function does nothing other than switch the CSS class selected via classList.toggle() and in this way switch back and forth between white and red backgrounds.
If you now click on the <div> element that contains the C, this element is colored red. The event is then passed on to the parent element with the 2, which also colors this element red. The event is then forwarded again to the outermost <div> element, where the event listener is also executed and the background color of the element is also colored red.
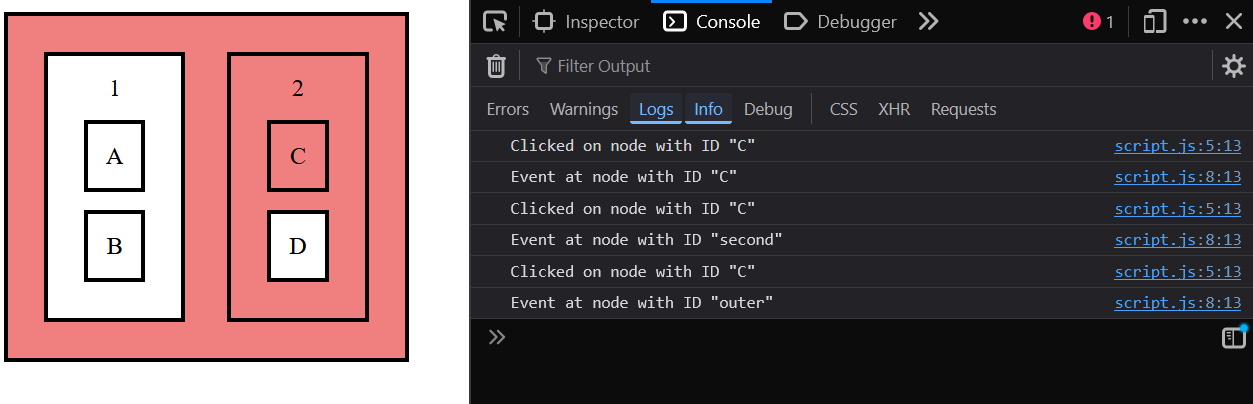
However, if you click on the <div> element with the 2, its event listener is executed first and the background color is set to red. The event listener is then executed for the parent element, i.e. the outermost <div> element, and the background color turns red there too.
If you register an event handler, it is always executed in the bubbling phase. In contrast to event listeners, you do not have the option of influencing the phase in which the event handler is to be executed.
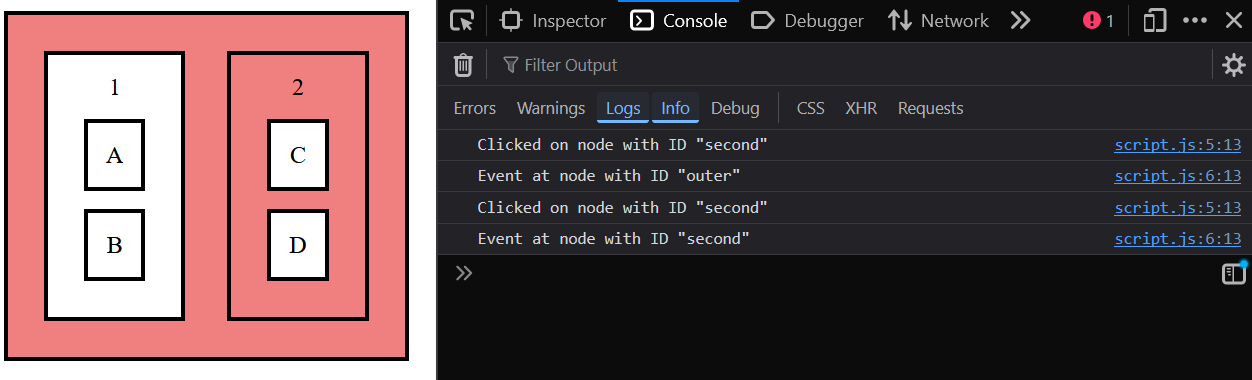
Here is an example to illustrate the principle of event capturing:
Using the addEventListener() method, it is possible to register a function as an event listener for the capturing phase. This can be controlled via the third parameter of this method, where a Boolean value can be specified that determines whether the respective function is to be registered as an event listener for the bubbling phase or for the capturing phase.
By default, registration takes place for the bubbling phase, but if the event listener is to be registered for the capturing phase, the value true must be transferred.
Complete Code - Examples/Part_292/...
 ...
 function handler(ev) {
   const e = ev || window.event;
   const target = e.target || e.srcElement;
   this.classList.toggle('selected');
   console.log('Clicked on node with ID "' + target.id + '"');
   console.log('Event at node with ID "' + this.id + '"');
 }
 function init() {
   const elements = document.querySelectorAll('.level1, .level2, .level3');
   for(let i=0; i<elements.length; i++) {
     elements[i].addEventListener('click', handler, true);
     // elements[i].onclick = handler;              // Always bubbling phase
     // elements[i].attachEvent('click', handler);  // Internet Explorer < 9 always bubbling phase
   }
 }
 document.addEventListener('DOMContentLoaded', init);
The event listeners for the click event are now not registered for the bubbling phase (as in the previous example), but for the capturing phase.
If the element with the value C is clicked again, the event does not trigger the event phase in the bubbling phase (starting from the target element), but in the capturing phase starting from the document node. The bubbling phase is still triggered in order to be able to execute other event handlers and event listeners that have been registered for the bubbling phase. The first element that has registered an event listener for this event is the outermost <div> element, i.e. the event listener for this element is executed first. The event then moves down the DOM tree (capturing phase) and triggers the event listener for the element with the 2. Only finally is the event listener triggered for the element that was clicked on (C).
Even if you click on the <div> element with the 2, the graphical result looks exactly the same as in the previous example (bubbling phase), only the order in which the event listeners are executed differs.
4.2. Interrupt the flow of events
If an event is triggered, actions that normally occur as a result of the event can be prevented:
- stopPropagation(): This method can be used to prevent the corresponding event in the domain tree from being passed on to the next element and triggering actions on other elements.
- preventDefault(): This method can be used to prevent the browser's standard actions from being executed when an event occurs. For example, the browser can be prevented from opening a link when it is clicked.
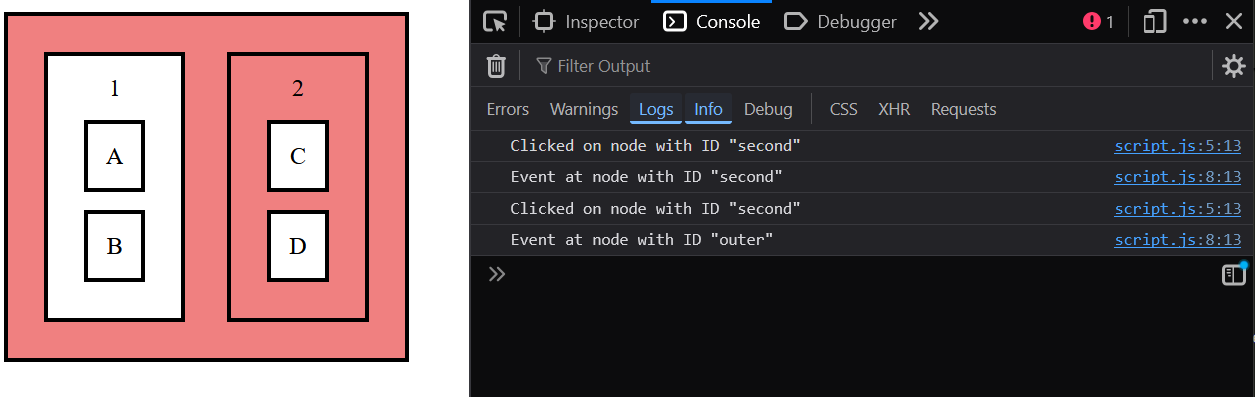
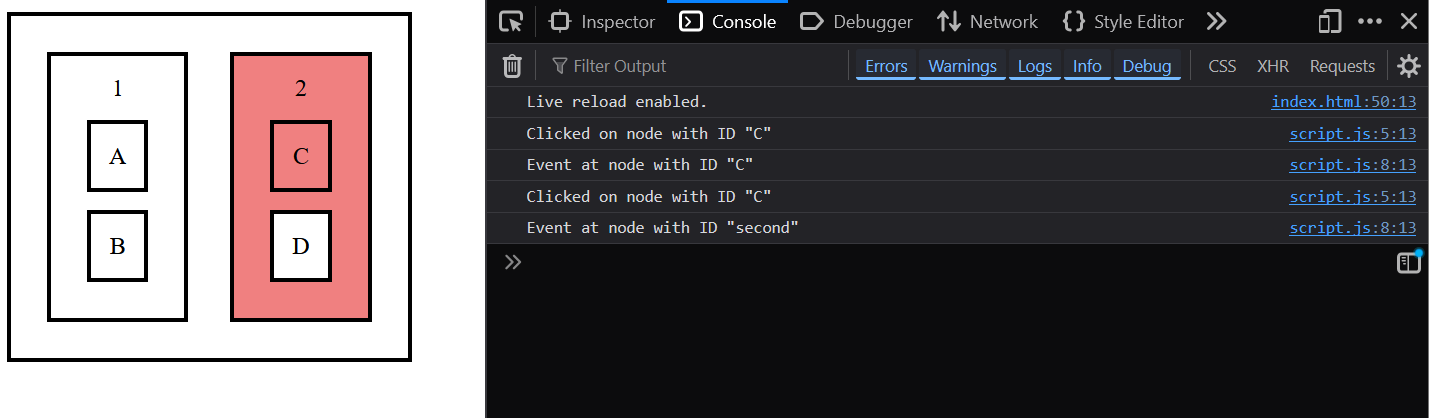
The next example shows an extension of the previous example 4.1. The event phases. Here, an additional if statement is used to check whether the current element (this) contains the CSS class level2. If this is the case, the stopPropagation() method is executed on the event object.
Complete Code - Examples/Part_293/...
 function handler(ev) {
     const e = ev || window.event;
     const target = e.target || e.srcElement;
     this.classList.toggle('selected');
     console.log(
    `Clicked on node with ID "${target.id}"`
     );
     console.log(
       `Event at node with ID "${this.id}"`
     );
     if(this.classList.contains('level2')) {             // As soon as level 2 is reached ...
       e.stopPropagation();                              // ... the event is not ...
     }                                                   // ... passed on.
   }
   function init() {
     const elements = document.querySelectorAll('.level1, .level2, .level3');
     for(let i=0; i<elements.length; i++) {
       elements[i].addEventListener('click', handler);
     }
   }
   document.addEventListener('DOMContentLoaded', init);
If you now click on a <div> element of the third level (e.g. C again), by default (for an event listener registered for the bubbling phase) only this element and the element that contains the 2 contains colored red. Since propagation is prevented via the stopPropagation() method, it does not reach the outermost <div> element.
Interrupt the event flow immediately
More than one event listener can be registered for an event per element. If the stopPropagation() method is then called in one of these event listeners, all other event listeners for this element are still executed:
Complete Code - Examples/Part_294/...
 function handleClickEvent1(ev) {
     const e = ev || window.event;
     this.classList.toggle('selected');
     e.stopPropagation();
   }
   function handleClickEvent2(ev) {
     const e = ev || window.event;
     this.classList.toggle('selected-border');
     e.stopPropagation();
   }
   function init() {
     var elements = document.querySelectorAll('.level1, .level2, .level3');
     for(var i=0; i<elements.length; i++) {
       elements[i].addEventListener('click', handleClickEvent1);
       elements[i].addEventListener('click', handleClickEvent2);
     }
  }
Here, the two functions handleClickEvent1() and handleClickEvent2() are registered as event listeners for the click event on all <div> elements. The method handleClickEvent1() switches the CSS class selected and colors the background color of the respective element red the first time it is executed.
The handleClickEvent2() method works in a similar way, but the respective element is given a dashed frame. Both methods also prevent the event from being forwarded by calling the stopPropagation() method.
If you now click on the <div> element with the C, the handleClickEvent1() function is executed first, then the event object is passed on (despite stopPropagation()) and the handleClickEvent2() function is executed. This means that the stopPropagation() method does not prevent the event from being forwarded between event listeners that are registered for the corresponding event on one and the same element. The method only prevents forwarding to event listeners that have been registered for the event on other elements.
If, on the other hand, you want to prevent the forwarding of an event for the event listeners registered on a single element, you must use the stopImmediatePropagation() method:
Complete Code - Examples/Part_295/...
 function handleClickEvent1(ev) {
   const e = ev || window.event;
   this.classList.toggle('selected');
   e.stopImmediatePropagation();
 }
 function handleClickEvent2(ev) {
   const e = ev || window.event;
   this.classList.toggle('selected-border');
   e.stopPropagation();
 }
 function init() {
   const elements = document.querySelectorAll('.level1, .level2, .level3');
   for(let i=0; i<elements.length; i++) {
     elements[i].addEventListener('click', handleClickEvent1);
     elements[i].addEventListener('click', handleClickEvent2);
   }
 }
Here, the function handleClickEvent1() now calls precisely this method, which in turn ensures that the second registered event listener will no longer call the function handleClickEvent2().
The stopPropagation() method prevents events from being forwarded to event listeners that are defined for the respective event on other elements, while the stopImmediatePropagation() method prevents events from being forwarded to event listeners that have been registered for the event on the same element.
4.3. Prevent standard actions of events
The preventDefault() method can be used to prevent the browser's default actions.
Complete Code - Examples/Part_296/...
 <body>
   <a id="link" href="http://www.google.de">Link</a>
 <script>
 function handleLinkClicked(e) {
   console.log('Clicked link');
   e.preventDefault();
 }

 function init() {
   const element = document.getElementById('link');
   element.addEventListener(
     'click',
     handleLinkClicked,
     false
   );
 }

 document.addEventListener('DOMContentLoaded', init);
 </script>
 </body>
Here, the function handleLinkClicked() is registered as an event listener for the click event of a link (<a>). If the link is clicked, the corresponding linked URL (google.com) is not opened, as it is prevented by calling the preventDefault() method.

It is not possible to call the preventDefault() method for event handlers. Instead, this is determined by the return value of the function defined as an event handler. If this is false, the default actions are prevented, but if it is true or no return value is specified, the default actions are executed:
Complete Code - Examples/Part_297/...
 function handleLinkClicked(e) {
   console.log('Clicked link');
   return false;
 }

 function init() {
   const element = document.getElementById('link');
   element.onclick = handleLinkClicked;
 }

 document.addEventListener('DOMContentLoaded', init);
The function handleLinkClicked(), which was defined as an event handler, returns the value false here, as a result of which the browser does not open the URL of the clicked link.

Generic helper function
A generic helper function ensures that the standard actions of the browser are prevented for both event listeners and event handlers. This function first checks whether the preventDefault() method exists on the event object. If this is the case, the method is called. If this is not the case, a trick is used to set the return value of the (supposed) event handler to false via the returnValue property:
Complete Code - Examples/Part_298/...
     <body>
   <a id="link" href="http://www.google.de">Link</a>
   <a id="link2" href="http://www.github.com">Link</a>
 <script>
 function handleLinkClicked(e) {
     console.log('Clicked link');
     stopDefault(e);
   }

   function init() {
     const element = document.getElementById('link');
     element.onclick = handleLinkClicked;
     const element2 = document.getElementById('link2');
     element2.addEventListener(
       'click',
       handleLinkClicked,
       false
     );
   }

   // Helper function for preventing standard actions
   function stopDefault(e) {
     if (e && e.preventDefault) {
       e.preventDefault();
     } else if (window.event && window.event.returnValue) {
       window.event.returnValue = false;
     }
   }

   document.addEventListener('DOMContentLoaded', init);
 </script>
 </body>

The return value false in a function defined in an event handler not only prevents the standard actions of the browser that are normally executed for the respective event, but also the forwarding of the event. The return value false is virtually the same as preventDefault() and stopPropagation() for event listeners.
5. Trigger events programmatically
Events can be triggered not only by user actions, but also programmatically, i.e. by JavaScript code.
5.1. Trigger simple events
To trigger an event programmatically, an object instance of Event is simply created and this is then used as an argument for the dispatchEvent() method, which is available to every element in the DOM tree.
The first argument passed to the constructor of Event is a character string that defines the type of event. Optionally, a configuration object, which is then passed as the second argument, can be used to determine whether the event should go through the bubbling phase (via the bubbles property) and whether it is permitted to prevent the standard actions of the browser (via the cancelable property).
The object instance created via the constructor can then be passed to the dispatchEvent() method, which internally ensures that this event is triggered on the element on which the method is called.
Complete Code - Examples/Part_299/...
<body>
<div id="example"></div>
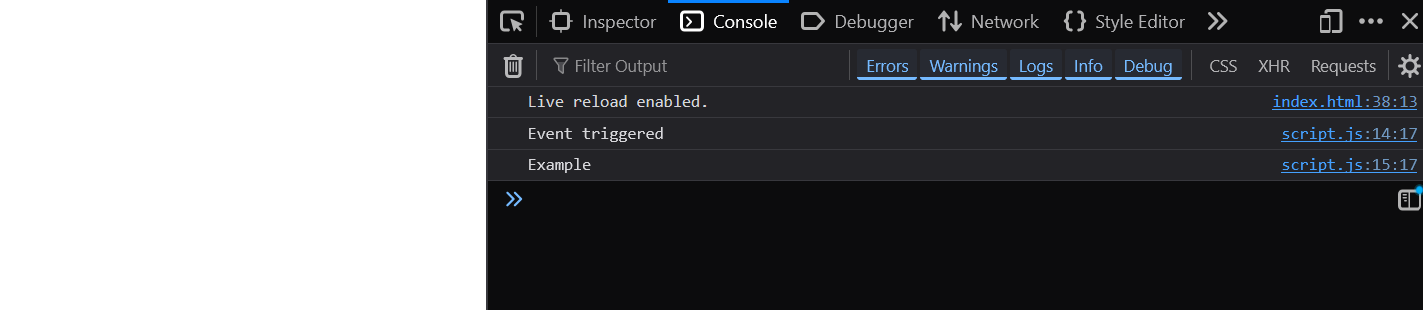
<script>
function init() {
const element = document.getElementById('example')
const event = new Event(
'Example', // Type of event
{
bubbles: true, // Allow bubbling
cancelable: false // Standard actions cannot be ...
// ... be prevented.
});
element.addEventListener(
'Example', // Type of event
(event) => {
console.log('Event triggered');
console.log(event.type); // "Example"
},
false
);
element.dispatchEvent(event);
}
document.addEventListener('DOMContentLoaded', init);
</script>
</body>
5.2. Trigger events with passed arguments
If you want to give the triggered event or the corresponding event object specific information that can then be accessed within the defined event handlers and registered event listeners, use the object type CustomEvent instead of the object type Event.
If you want to provide the triggered event or the corresponding event object with certain information that can then be accessed within the defined event handlers and registriThe constructor of CustomEvent can be passed corresponding data within the configuration object via the detail property.
Complete Code - Examples/Part_300/...
 <body>
   <div id="example"></div>
   <script>
 function init() {
     const element = document.getElementById('example')
     const event = new CustomEvent('Example', {
       detail: {
         firstName: 'Rick',
         lastName: 'Sample',
         id: 420
       }
     });
     element.addEventListener(
       'Example',
       (event) => {
         console.log('Event triggered');
         console.log(event.type);             // "Example"
         console.log(event.detail.firstName); // "Rick"
         console.log(event.detail.lastName);  // "Sample"
         console.log(event.detail.id);        // 420
       },
       false
     );
     element.dispatchEvent(event);
   }

   document.addEventListener('DOMContentLoaded', init);
   </script>
 </body>
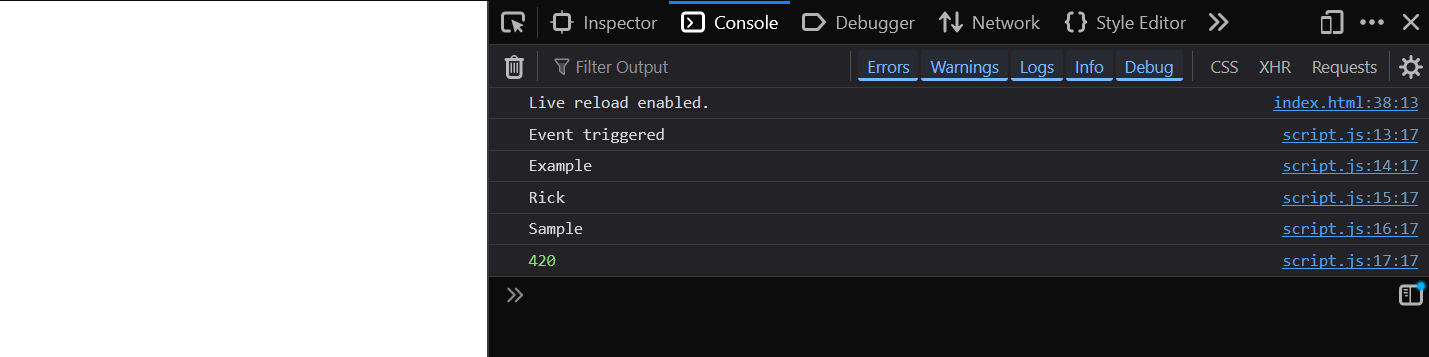
Here, an object with the properties firstName, lastName and id was passed to the event object as an argument and read out within the event listener. If the event listener is to be accessed, the object type CustomEvent is used instead of the object type Event.
5.3. Trigger standard events
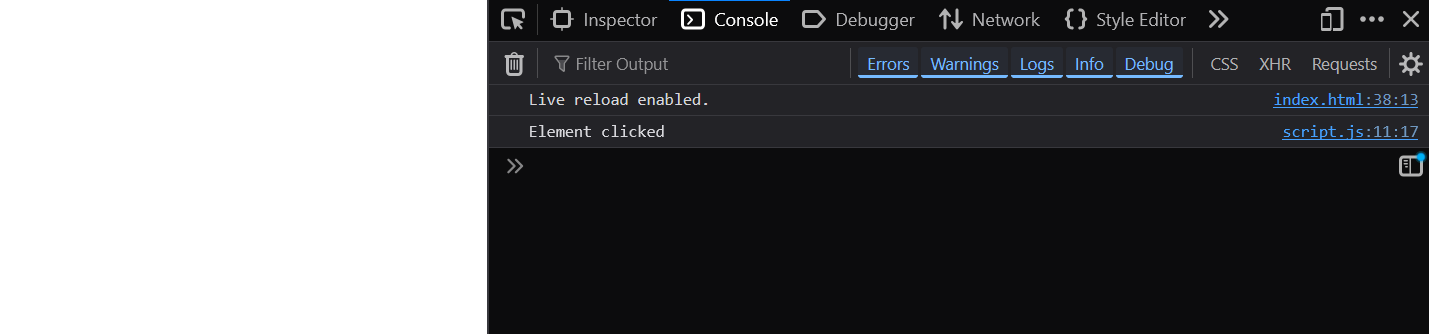
In addition, it is also possible to trigger any other events (e.g. mouse events or keyboard events) programmatically and thus simulate user actions.
Complete Code - Examples/Part_301/...
 <body>
   <div id="example"></div>
   <script>
 function init() {
     const element = document.getElementById('example')
     const event = new MouseEvent('click', {
       'view': window,
       'bubbles': true,
       'cancelable': true
     });
     element.addEventListener(
       'click',
       (event) => {
         console.log('Element clicked');
       },
       false
     );
     element.dispatchEvent(event);
   }

   document.addEventListener('DOMContentLoaded', init);
   </script>
 </body>
Here, an object instance of the respective event object type was simply created on the basis of a mouse event and this was passed as in the dispatchEvent() method.
Related links: