Change websites dynamically
1. Document Object Model (DOM)
Every time a website is called up in the browser, the browser creates a corresponding model of the website in the working memory, which is referred to as a so-called Document Object Model or DOM for short. The DOM is primarily used to access website content via JavaScript, e.g. to change existing content or add new content. It represents the components of a website hierarchically in a tree representation, which is also referred to as a DOM tree. A DOM tree in turn is made up of so-called nodes, which reflect the structure of a website through their hierarchical arrangement.
For a short introduction to the Document Object Model (DOM) click here:Introduction to the DOM. For more than just an introduction, read on.
2. Select elements
2.1. Select elements by ID
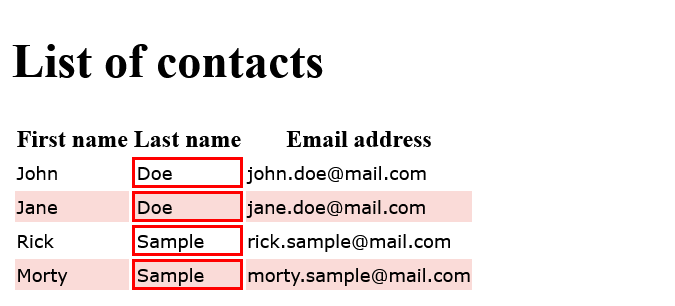
Elements on a website can be assigned an ID via the id attribute. This ID can be used in CSS rules or the corresponding element can be selected via JavaScript using the getElementById() method of the document object. The method only needs to be passed the ID of the element to be selected in the form of a string.
Complete Code - Examples/Part_255/index.js...
 ...
   <style>
     .border {
       border: 3px solid red;
       border-radius: 4px;
       padding: 25px 25px 25px 25px;
       }
   </style>
 </head>
 <body>
 <main id="main">

 </main>
 <script>
   // Selection by ID
   const mainElement = document.getElementById('main');
   mainElement.className = 'border';
 </script>
 ...
 // Selection by ID
 const mainElement = document.getElementById('main');
 mainElement.className = 'border';
Here, the element with the ID main is selected and saved in the variable mainElement. The class attribute of the element is then changed to the value border via the className property, which results in the element being given a red border with rounded corners.

If no element with the transferred ID can be found, the getElementById() method returns the value null. If an attempt is then made to access a property or method of the supposed element, a runtime error occurs. To prevent this, an if query should be used to ensure that the return value of getElementById() is not null.
 const mainElement = document.getElementById('main');
   if(mainElement !== null) {
     mainElement.className = 'border';
   }
Alternatively, the whole thing can also be shortened with the && operator, where the second operand is only evaluated if the first operand returns a true. So the operand (mainElement.className = 'border') would only be evaluated if mainElement has a value that does not evaluate to false, i.e. is not null.
 const mainElement = document.getElementById('main');
 mainElement && (mainElement.className = 'border');
The check is even shorter with the Optional Chaining Operator ?. The property is only accessed if mainElement is not null or undefined.
  const mainElement = document.getElementById('main');
  mainElement?.className = 'border';
2.2. Select elements by class
CSS classes can also be assigned to individual elements on a website, similar to IDs. These classes are managed via the class attribute. An element can have several classes and, unlike IDs, several elements can also have the same class (IDs are unique and may only be assigned once in the code). As a result, the corresponding DOM method getElementsByClassName(), with which a selection by CSS classes is possible, not only returns a single element, but several elements if necessary. The class name is passed to the method as a string as an argument.
Complete Code - Examples/Part_256/...
...
<body>
<main id="main">
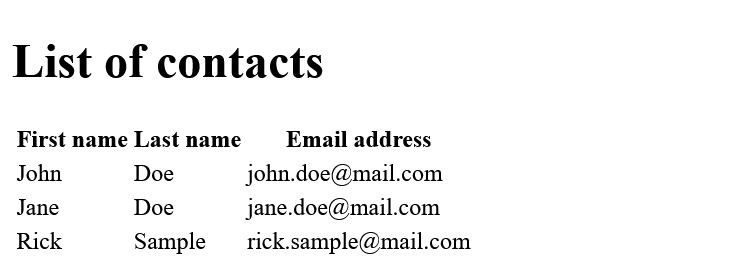
<h1>List of contacts</h1>
<table id="contact-list-table" summary="List of contacts">
<thead>
<tr>
<th id="table-header-first-name">First name</th>
<th id="table-header-last-name">Last name</th>
<th id="table-header-email ">Email address</th>
</tr>
</thead>
<tbody>
<tr class="row odd">
<td>John</td><td>Doe</td><td>john.doe@mail.com</td>
</tr>
<tr class="row even">
<td>Jane</td><td>Doe</td><td>jane.doe@mail.com</td>
</tr>
<tr class="row odd">
<td>Rick</td><td>Sample</td><td>rick.sample@mail.com</td>
</tr>
<tr class="row even">
<td>Morty</td><td>Sample</td><td>morty.sample@mail.com</td>
</tr>
</tbody>
</table>
</main>
<script>
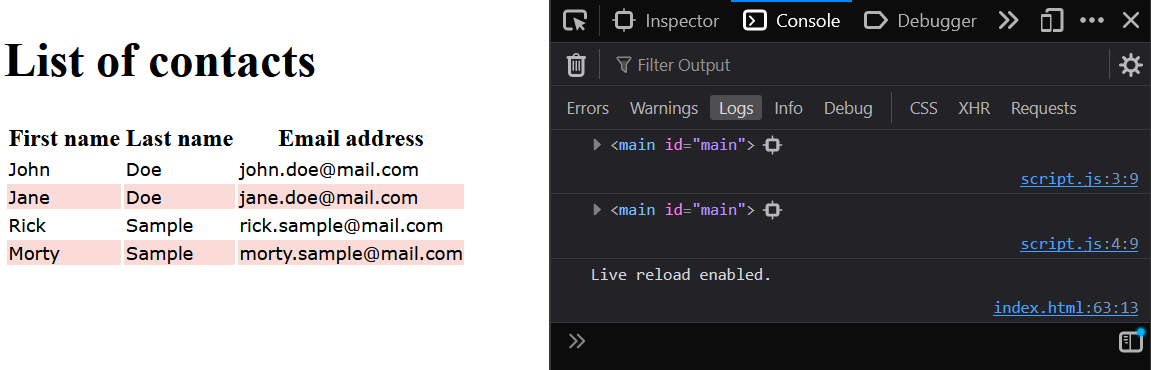
// Selection by class name
const tableRowsEven = document.getElementsByClassName('even'); // Select all even table rows
if(tableRowsEven.length > 0) { // If at least one element was found
for(let i = 0; i < tableRowsEven.length; i++) { // Go through all elements
const tableRow = tableRowsEven[i]; // Assign element to a variable
tableRow.style.backgroundColor = '#FADBD8'; // Set new background color
}
}
</script>
</body>
...
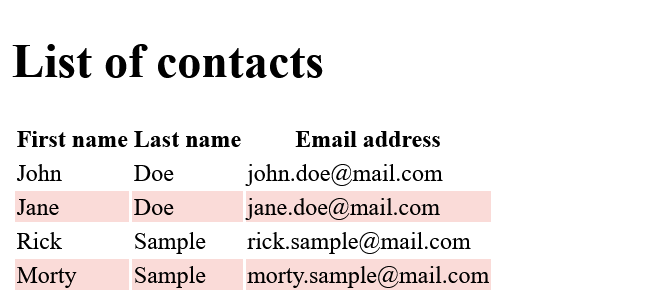
All elements containing the CSS class even are selected here. The return value of getElementsByClassName is a node list (an object of type nodeList), which is to be used similarly to an array. This node list contains the elements in the exact order in which they appear on the web page. Even if node lists look like arrays, they are not arrays. What node lists have in common with arrays is that the individual elements in a node list can be accessed via an index, i.e. the first element can be accessed via tableRowEven[0] the second element via tableRowEven[1] and so on. Another common feature is the length property, which can be used to find out the number of elements in the node list. Here, the for loop is used to iterate over all elements of the list. As with iteration over real arrays, the length property and access by index can be used. In this way, each element in the list is assigned a new background color.
As an alternative to the array syntax with square brackets, the item() method can be used to access individual nodes in a node list.
Complete Code - Examples/Part_256/script.js...
 const tableRowsEven = document.getElementsByClassName('even');      // Select all even table rows
   if(tableRowsEven.length > 0) {                                    // If at least one element was found
     for(let i = 0; i < tableRowsEven.length; i++) {                 // Go through all elements
       const tableRow = tableRowsEven.item(i);                       // Assign element to a variable
       tableRow.style.backgroundColor = '#FADBD8';                   // Set new background color
     }
   }
The index of the element to be returned is also passed as an argument here.
Since node lists are not real arrays, but array-like objects, the method borrowing technique is often used in practice in order to still be able to use methods from arrays:
Complete Code - Examples/Part_256/script.js...
 Array.prototype.forEach.call(tableRowsEven, (tableRow) => {
   tableRow.style.backgroundColor = '#FADBD8';
 });
The selection of an element by ID (getElementById()) is faster in terms of performance compared to other selection methods, as it is not permitted to have several elements with the same ID on a website, and therefore the element can be found quickly. Other selection methods such as getElementsByClassName() are significantly slower in comparison, because every element on the web page has to be checked.
2.3. Select elements by element name
The getElementsByTagName() method can be used to select elements based on their element name. The method expects the name of the element:
Complete Code - Examples/Part_257/...
...
<body>
<main id="main">
<h1>List of contacts</h1>
<table id="contact-list-table" summary="List of contacts">
<thead>
<tr>
<th id="table-header-first-name">First name</th>
<th id="table-header-last-name">Last name</th>
<th id="table-header-email ">Email address</th>
</tr>
</thead>
<tbody>
<tr class="row odd">
<td>John</td><td>Doe</td><td>john.doe@mail.com</td>
</tr>
<tr class="row even">
<td>Jane</td><td>Doe</td><td>jane.doe@mail.com</td>
</tr>
<tr class="row odd">
<td>Rick</td><td>Sample</td><td>rick.sample@mail.com</td>
</tr>
<tr class="row even">
<td>Morty</td><td>Sample</td><td>morty.sample@mail.com</td>
</tr>
</tbody>
</table>
</main>
<script>
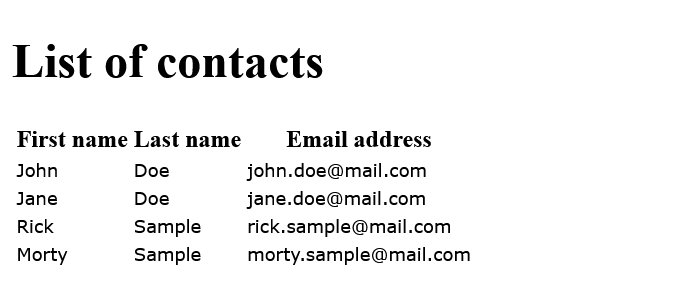
// Selection by element name
const tableCells = document.getElementsByTagName('td');
if(tableCells.length > 0) { // If at least one element was found
for(let i = 0; i < tableCells.length; i++) { // Go through all elements
const tableCell = tableCells[i]; // Assign element to a variable
tableCell.style.fontFamily = 'Verdana'; // Set new font
tableCell.style.fontSize = '12px'; // Set new font size
}
};
</script>
</body>
...
Here, all table cells are first selected using the getElementsByTagName() method, and then a new font and new font size are assigned to each element. In the getElementsByTagName() method, only the name of the element (here td) is transferred, the angle brackets <> must not be used there.
2.4. Select elements by name
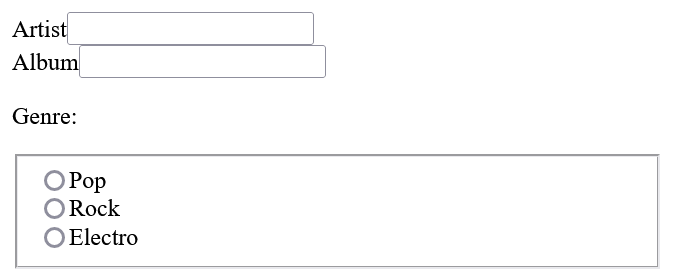
Some elements can be assigned a name attribute in HTML, e.g. <input> elements of type radio, to indicate that they belong to a selection group:
Complete Code - Examples/Part_258/...
 ...
 <body>
 <main id="main">
   <form action="">
     <label for="artist">Artist</label><input id="artist" type="text" name="artist"><br>
     <label for="album">Album</label><input id="album" type="text" name="album"><br>
     <p>Genre:</p>
     <fieldset>
       <input type="radio" id="po" name="genre" value="Pop"><label for="po">Pop</label><br>
       <input type="radio" id="ro" name="genre" value="Rock"><label for="ro">Rock</label><br>
       <input type="radio" id="el" name="genre" value="Electro"><label for="el">Electro</label>
     </fieldset>
   </form>
 </main>
 <script src="script/.js"></script>
 </body>
 ...
All elements whose name attribute has the value genre are selected here, the name attributes artist and album are not selected.
The values of these elements (inputElement.value) are output in the subsequent loop: Pop, Rock, Electro:
Complete Code - Examples/Part_258/script.js...
 // Selection by name
 const inputElementsForGenre = document.getElementsByName('genre');  // Select all elements with names
   if(inputElementsForGenre.length > 0) {                            // If at least one element was found
     for(let i = 0; i < inputElementsForGenre.length; i++) {         // Go through all elements
       const inputElement = inputElementsForGenre[i];                // Assign element to a variable
       console.log(inputElement.value);                              // output: Pop, Rock, Electro
     }
   }
2.5. Select elements via selector
It is not always the case that the element you want to select has an ID or class, so the methods getElementById() and getElementsByClassName() are of no help in such cases. The method getElementsByTagName() is very unspecific, because usually rather many elements are selected. The method getElementsByName() should be used with caution due to the fact that not all browsers support this method. This is where the querySelector() and querySelectorAll() methods come into play, as they are much more versatile and expressive for returning elements for a given CSS selector.
Complete Code - Examples/Part_259/...
 <body>
 <main id="main">
   <h1>List of contacts</h1>
   <table id="contact-list-table" summary="List of contacts">
     <thead>
       <tr>
         <th id="table-header-first-name">First name</th>
         <th id="table-header-last-name">Last name</th>
         <th id="table-header-email ">Email address</th>
       </tr>
     </thead>
     <tbody>
       <tr class="row odd">
         <td>John</td><td>Doe</td><td>john.doe@mail.com</td>
       </tr>
       <tr class="row even">
         <td>Jane</td><td>Doe</td><td>jane.doe@mail.com</td>
       </tr>
       <tr class="row odd">
         <td>Rick</td><td>Sample</td><td>rick.sample@mail.com</td>
       </tr>
       <tr class="row even">
         <td>Morty</td><td>Sample</td><td>morty.sample@mail.com</td>
       </tr>
     </tbody>
   </table>
 </main>
 <script src="script.js"></script>
 </body>
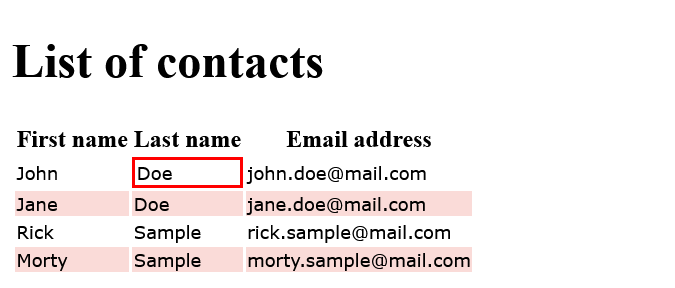
 // Select elements with querySelector
 const tableCell = document.querySelector('#main table td:nth-child(2)');
 tableCell.style.border = '2px solid red';
The CSS selector #main table td is passed here, which in CSS initially describes the second table cells of each row (td:nth-child(2)) within a table (table) within an element with the ID main (#main). However, as the querySelector() method only selects the first element that matches a selector, only the first <td> element is returned.
The queryySelectorAll() method is used here. The same CSS selector is used here as before. This time, however, it receives all elements that match this selector, i.e. all second <td> elements.
Complete Code - Examples/Part_260/...
 // Select elements with querySelectorAll
 const tableCells = document.querySelectorAll('#main table td:nth-child(2)');
 if(tableCells.length > 0) {
   for(let i=0; i<tableCells.length; i++) {
     const tableCell = tableCells[i];
     tableCell.style.border = '2px solid red';
   }
 }
Within the loop, these elements are then provided with a red frame in the same way as with querySelector().
A short overview of the various selectors in CSS
| Selector | Description |
|---|---|
| * | Selects each element. |
| [a] | Selects elements with the attribute a. |
| :root | Selects the root element of a document. |
| :nth-child(n) | Selects the nth child element of an element. |
| :nth-last.child(n) | Selects the nth child element of an element from behind. |
| :first-child | Selects the first child element of an element. |
| :last-child | Selects the last child element of an element. |
| :empty | Selects elements that have no child elements. |
| :link | Selects links that have not yet been clicked. |
| :visited | Selects links that have already been clicked. |
| :hover | Selects links over which the mouse is currently positioned. |
| .className | Selects elements whose class attribute has the value className |
| #main | Selects elements whose id attribute has the value main. |
| :not(s) | Selects elements that do not match the selector s specified in brackets. |
| E > F | Selects elements of type F that are child elements of an element of type E. |
2.6. Select the parent element of an element
Element nodes have various properties that can be used to access related elements. Related elements are parent nodes or parent elements, child nodes or child elements and sibling nodes or sibling elements.
The properties parentNode and parentElement are available for the selection of parent nodes/parent elements, and the properties firstChild, firstElementChild, lastChild, lastElementChild, childNodes and children are available for the selection of child nodes/child elements. The properties previousSibling, previousElementSibling, nextSibling and nextElementSibling are available for the selection of sibling nodes/sibling elements.
To select the parent node of an element (or node), the parentNode property is available, to select the parent element, the parentElement property is available. In most cases, the parent node is also always an element, i.e. the two properties parentNode and parentElement contain the same value:
Complete Code - Examples/Part_261/...
 // Select the parent element of an element
 const table = document.querySelector('table');
 console.log(table.parentNode);      // <main>
 console.log(table.parentElement);   // <main>
Not all nodes in the DOM tree are elements, but all elements are always nodes. It is important to understand that some of the properties mentioned return nodes and other properties return elements. The properties parentNode, childNodes, firstChild, lastChild, previousSibling and nextSibling return nodes. The properties parentElement, children, firstElementChild, lastElementChild, previousElementSibling and nextElementSibling return elements.
 <!DOCTYPE html>
   <!-- parentNode -->
 <html>    <!-- parentElement -> null -->
   <!-- parentNode / parentElement-->
 <body>
   Text  <!-- firstChild (to body) -->
   <!-- nextSibling (text to span) / previousSiblling (span to text) -->
   <span></span>   <!-- firstElementChild to body -->
   <!-- nextSibling / previousSiblling -->
   Text
   <!-- nextSibling / previousSiblling -->
   <span></span>   <!-- lastElementChild (to body) -->
   <!-- nextSibling / previousSiblling -->
   Text  <!-- lastChild to body -->
 </body>
 </html>
Here is a website with a relatively simple structure, in which there are only two <span> elements within the <body> element and text before and after it.
The corresponding DOM therefore contains a text node, an element node, a text node, an element node and another text node below the <body> element. For all these nodes, the <body> element represents both the parent node and the parent element. This means that the properties parentNode and parentElement have the same value for all these nodes: the <body> element.
The properties parentNode and parentElement generally always reference the same element for all nodes. The only exception is the <html> element. This element does not have a parent element, but only a parent node, i.e. the document node. In this case, the parentElement property returns the value null.
2.7. Select the child elements of an element
The child elements of an element can be determined via the children properties, the child nodes via the childNodes property. Whether an element has child nodes can be determined using the hasChildNodes() method, which returns a Boolean value. Whether an element has child elements can be determined via the childElementCount property, which contains the number of child elements.
Complete Code - Examples/Part_262/index.html...
 ...
  <tbody>
    <tr class="row odd">
      <td>John</td><td>Doe</td><td>john.doe@mail.com</td>
    </tr>
    <tr class="row even">
      <td>Jane</td><td>Doe</td><td>jane.doe@mail.com</td>
    </tr>
    <tr class="row odd">
      <td>Rick</td><td>Sample</td><td>rick.sample@mail.com</td>
    </tr>
    <tr class="row even">
      <td>Morty</td><td>Sample</td><td>morty.sample@mail.com</td>
    </tr>
  </tbody>
 ...
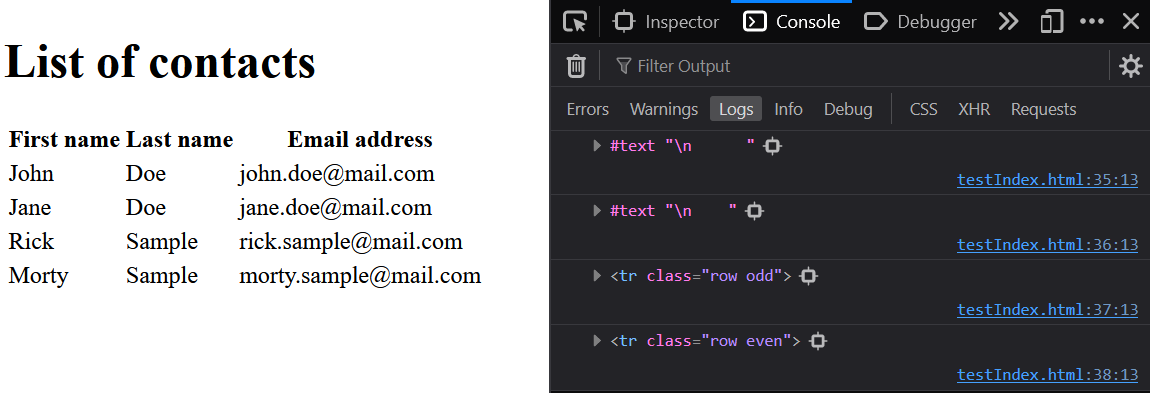
The <tbody> element here has four child elements (<tr>) and a total of nine child nodes. The reason for this is that so-called white space nodes are created even though no text is instanced in the HTML between, before and after the four <tr> elements. These white space nodes are always created when, for example, line breaks are used in HTML between two elements.

Various other properties are available with which individual child elements or child nodes can be selected:
- firstChild contains the first child node.
- lastChild contains the last child node.
- firstElementChild contains the first child element.
- lastElementChild contains the last child element.
Access to special child nodes and child elements:
Complete Code - Examples/Part_262/...
 const tbody = document.querySelector('tbody');
 console.log(tbody.firstChild);        // Text node
 console.log(tbody.lastChild);         // Text node
 console.log(tbody.firstElementChild); // <tr>
 console.log(tbody.lastElementChild);  // <tr>
2.8. Select the sibling elements of an element
How to select the parent element and the child elements of an element has just been shown. There is also the option of selecting the sibling nodes or sibling elements within a level of the DOM.
- previousSibling contains the previous sibling node.
- nextSibling contains the next sibling node.
- previousElementSibling contains the previous sibling element.
- nextElementSibling contains the next sibling element.
Access to special sibling nodes and sibling elements:
Complete Code - Examples/Part_262/script.js...
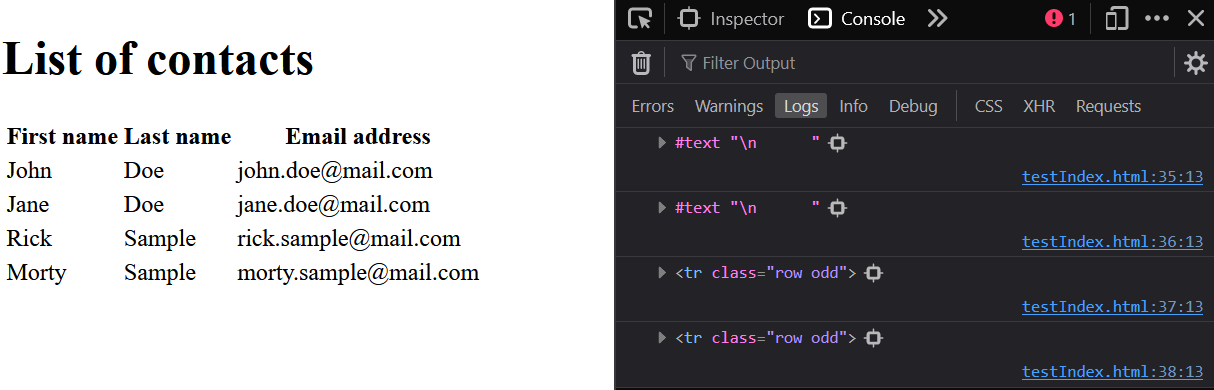
 const tableCell = document.querySelector('tbody tr:nth-child(2)');
 console.log(tableCell.previousSibling);        // Text node
 console.log(tableCell.nextSibling);            // Text node
 console.log(tableCell.previousElementSibling); // <tr>
 console.log(tableCell.nextElementSibling);     // <tr>
Here, starting from the second table row, the preceding (via previousSibling) and the following sibling node (via nextSibling) are selected first; in both cases, this is a text node. The preceding sibling element is then selected via previousElementSibling and the following sibling element via nextElementSibling.
2.9. Call up selection methods on elements
Most DOM methods for selecting elements (getElementsByClassName(), getElementsByTagName(), querySelector(), querySelectorAll()) can be called not only on the document node (document), but also on all other element nodes of a web page (getElementById() and getElementsByName() can only be called on the document node). In this case, the search for the elements includes the subtree below the element on which the respective method was called.
Complete Code - Examples/Part_263/...
<main id="main-content">
<ul id="list-1">
<li>List item 1</li>
<li>
List item 2
<ul id="list-2">
<li>List item 2.1</li>
<li>List item 2.2</li>
<li>List item 2.3</li>
<li>List item 2.4</li>
</ul>
</li>
<li>List item 3</li>
<li>List item 4</li>
</ul>
</main>
<script>
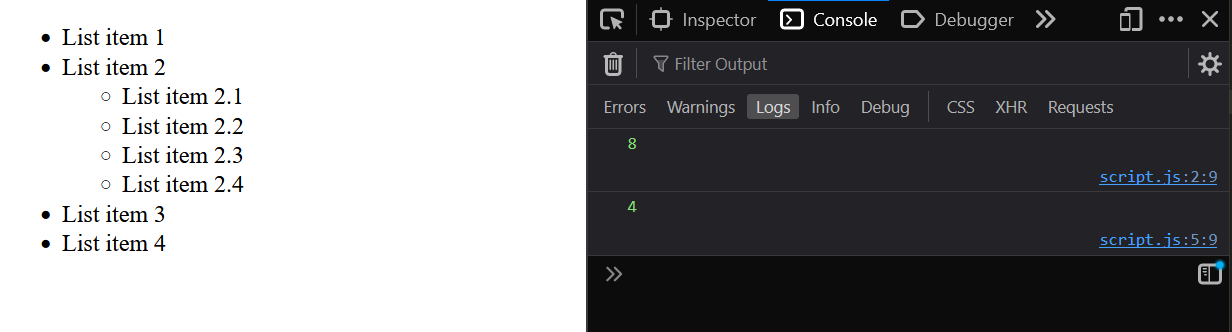
const allListItemElements = document.getElementsByTagName('li');
console.log(allListItemElements.length); // output: 8
const subList = document.getElementById('list-2');
const subListListItems = subList.getElementsByTagName('li');
console.log(subListListItems.length); // output: 4
</script>
Here, the method getElementsByTagName() with the argument li is first called on the document node document, which selects all list entries of the entire web page, and then on the nested list with the ID list-2, which in turn selects only the list entries that occur in this subtree of the DOM, i.e. below the nested list.
2.10. Select elements by type
After the preceding selection methods, the document object offers various properties to directly access certain elements of a web page:
| Feature | Description |
|---|---|
| document.anchors | Contains a list of all anchors of the web page. |
| document.forms | Contains a list of all forms on the website. |
| document.images | Contains a list of all images on the website. |
| document.links | Contains a list of all links on the website. |
| document.head | Access to the <head> element of the web page. |
| document.body | Access to the <body> element of the web page. |
3. Work with text nodes
If one or more elements have been selected, they can be changed. Text, attributes and elements can be added or removed. Any text on a web page within the DOM tree is represented as a text node.
The different methods and properties for changing elements:
| Property/Method | Description |
|---|---|
| textContent | This property can be used to access the text content of a node. |
| nodeValue | This property can be used to access the content of a node. |
| innerHTML | This property can be used to access the HTML content of a node. |
| createTextNode() | This method can be used to create text nodes. |
| createElement() | This method can be used to create elements. |
| createAttribute() | Attribute nodes can be created using this method. |
| appendChild() | This method can be used to add nodes to the DOM tree. |
| removeChild() | This method can be used to remove nodes from the DOM tree. |
These properties and methods are explained in the following sections.
3.1. Access the text content of an element
To access only the text content of an element, it is best to use the textContent property. The HTML markups within the respective element are ignored, as the textContent property ignores them:
Complete Code - Examples/Part_264/...
<body>
<main>
<ul id="news">
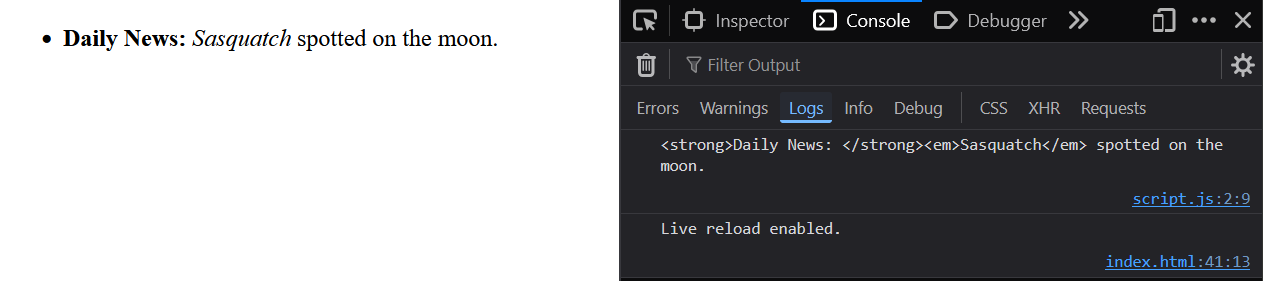
<li><strong>Daily News: </strong><em>Sasquatch</em> spotted on the moon.</li>
</ul>
</main>
<script>
const textContent = document.querySelector('#news li:nth-child(1)').textContent;
console.log(textContent);
// output: Daily News: Sasquatch spotted on the moon.
</script>
</body>
Here is a simple HTML list with one entry, the text contained there is marked by <strong> and <em> elements. When the textContent property is accessed, only the plain text of the <li> element is output, but not the markups it contains (<strong> and <em>).

3.2. Change the text content of an element
If the text content of an element is to be changed, the textContent property is also used. The new text is simply transferred as the value:
Complete Code - Examples/Part_265/...
  <body>
 <main>
   <ul id="news">
     <li></li>
   </ul>
 </main>
 <script>
   const element = document.querySelector('#news li:nth-child(1)');
   element.textContent = 'Daily News: The moon, Sasquatch was just a rock.';
 </script>
A new text is assigned to the list element here.

However, it should be noted that it is not possible to add markup (HTML markup) via textContent. Although the character string passed contains markup, this is not interpreted but displayed as text.
Complete Code - Examples/Part_266/script.js
 const element = document.querySelector('#news li:nth-child(1)');
 element.textContent = '<strong>Daily News:</strong> The moon, <em>Sasquatch</em> was just a rock';

textContent vs. innerText
In some browsers, the innerText property is still available, which works in a similar way to textContent but is not included in the DOM API and is therefore not supported by Firefox, for example. Therefore, innerText should be avoided.
3.3. Change the HTML below an element
If not only text but also HTML is to be inserted into an element, the innerHTML property can be used. There are other options that are used more frequently in practice, but for simple HTML blocks that are to be added, innerHTML is sufficient.
Complete Code - Examples/Part_267/...
 const element = document.querySelector('#news li:nth-child(1)');
 element.innerHTML = '<strong>Daily News:</strong> The moon, <em>Sasquatch</em> was just a rock.';
In this example, the same HTML block is used as in the previous example, but this time the HTML is also interpreted.

Conversely, the HTML content of an element can also be read via innerHTML. The result is a character string as with textContent, which now contains not only the text content but also the HTML markup:
Complete Code - Examples/Part_268/...
 <body>
   <main>
     <ul id="news">
       <li><strong>Daily News: </strong><em>Sasquatch</em> spotted on the moon.</li>
     </ul>
   </main>
 <script>
   const innerHTML = document.querySelector('#news li:nth-child(1)').innerHTML;
   console.log(innerHTML);
   /* output: <strong>Daily News: </strong><em>Sasquatch</em> spotted on the moon. */
 </script>
 </body>
3.4. Create and add text nodes
As an alternative to textContent and innerHTML, there is also the option of creating text nodes and adding them manually to the DOM tree. This can be done using the createTextNode() method.
Complete Code - Examples/Part_269/...
 <body>
 <main>
   <div id="container">

   </div>
 </main>
 <script>
   const element = document.getElementById('container');
   const textNode = document.createTextNode('Hello World');
   element.appendChild(textNode);
 </script>
 </body>
Here, a text node is created using the createTextNode() method and then added to an existing element as a child node using the appendChild() method. This step is necessary because the text is created using the createTextNode() method, but the text node is only added to the DOM tree using appendChild().

4. Work with elements
Elements can also be created manually and can then be added to the domain tree. The createElement() method is used to create elements. This expects the name of the element to be created as a parameter and returns the new element. The new element is not yet added to the DOM when the method is called.
4.1. Create and add elements
There are various options for adding generated elements to the DOM:
- Using insertBefore(), the element can be added as a child element before another element/node, i.e. defined as a previous sibling element.
- Via appendChild() the element can be added as the last child element of a parent element.
- An existing child element can be replaced with a new child element using replaceChild(). The method is called on the parent element and expects the new child node as the first parameter and the child node to be replaced as the second parameter.
Complete Code - Examples/Part_270/...
 <body onload="createTable()">
 <main id="main-content">
   <h1>List of contacts</h1>
   <table id="contact-table" summary="List of contacts">
     <thead>
       <tr>
         <th>First name</th>
         <th>Last name</th>
         <th>Email address</th>
       </tr>
     </thead>
     <tbody>
     </tbody>
   </table>
 </main>
 <script>
 const contacts = [
     {
       firstName: 'John ',
       lastName: 'Doe',
       email: 'john.doe@mail.com'
     },
     {
       firstName: 'Jane',
       lastName: 'Doe',
       email: 'jane.doe@mail.com'
     },
     {
       firstName: 'Rick ',
       lastName: 'Sample',
       email: 'rick.sample@mail.com'
     }
   ];

   function createTable() {
     const tableBody = document.querySelector('#contact-table tbody');
     for(let i=0; i<contacts.length; i++) {
       // For the current contact ...
       const contact = contacts[i];
       // ... a new line is created.
       // (1)
       const tableRow = document.createElement('tr');
       // Various cells are created within the row ...
       // (2)
       const tableCellFirstName = document.createElement('td');
       // ... and each filled with values.
       // (3)
       const firstName = document.createTextNode(contact.firstName);
       // (4)
       tableCellFirstName.appendChild(firstName);
       // (5)
       const tableCellLastName = document.createElement('td');
       // (6)
       const lastName = document.createTextNode(contact.lastName);
       // (7)
       tableCellLastName.appendChild(lastName);
       // (8)
       const tableCellEmail = document.createElement('td');
       // (9)
       const email = document.createTextNode(contact.email);
       // (10)
       tableCellEmail.appendChild(email);
       // (11)
       tableRow.appendChild(tableCellFirstName);
       // (12)
       tableRow.appendChild(tableCellLastName);
       // (13)
       tableRow.appendChild(tableCellEmail);
       // (14)
       tableBody.appendChild(tableRow);
     }
   }

 </script>
 </body>
An HTML table is generated here based on a contact list. The individual entries in the contact list contain information on the name and email address of the respective contact. The corresponding elements are created within the createElement() function. First, the <tbody> element in the HTML table is selected using the querySelector() method and then iterated over the array with the contact information. A table row <tr> is created for each entry using the createElement() method and a table row <td> is created for each property (firstName, lastName, email). Using the createTextNode() method, corresponding text nodes are created for the values of the properties and added to the respective <td> element using appendChild(). The generated table cells are then added to the corresponding table row as child elements at the end of the iteration and, in the last row of the iteration, the table row is added as a child element of the table body <tbody>.
4.2. Remove elements and nodes
To remove elements from a parent element, the removeChild() method is available. This method expects the element to be removed and also returns this as the return value.
Complete Code - Examples/Part_271/...
 ...
  function sortByFirstName() {
    const tableBody = document.querySelector('#contact-table tbody');
    while (tableBody.firstChild !== null) {
      tableBody.removeChild(tableBody.firstChild);
    }
    contacts.sort(function(contact1, contact2) {
      return contact1.firstName.localeCompare(contact2.firstName);
    })
    createTable();
  }
 ...
A method for filtering table data (sortByFirstName()) was created here, in which the removeChild() method is used to remove all child nodes and child elements from the table body so that they can then be sorted.

5. Work with attributes
Various methods are available in the DOM API for working with attributes:
- The getAttribute() method can be used to access the attributes of an element set.
- The setAttribute() method can be used to change the value of an attribute or add an attribute to an element.
- Attribute accounts can be created via the createAttribute() method and added to these via setAttributeNode().
- Attributes can be removed using the removeAttribute() method.
5.1. Read out the value of an attribute
To access the value of an attribute, the getAttribute() method is used. The method expects the name of the respective HTML attribute as a parameter. The value of the corresponding attribute is output as the return value:
Complete Code - Examples/Part_272/...
<body>
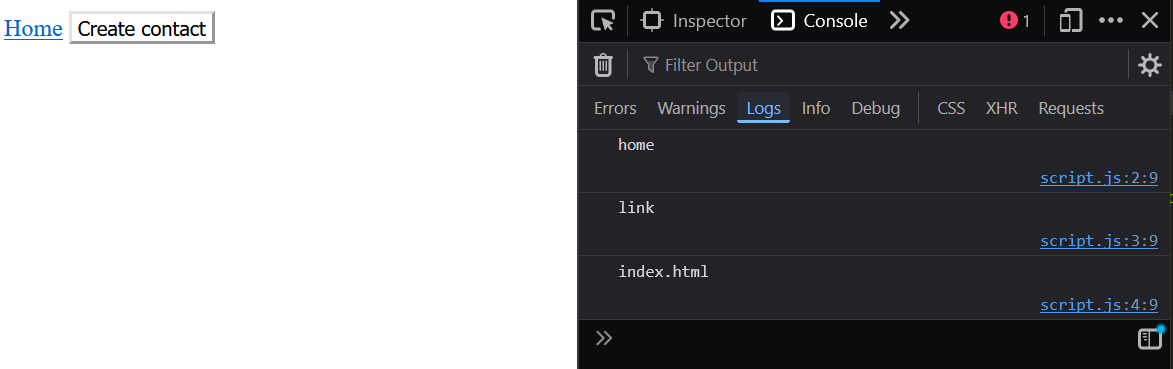
<a id="home" class="link" href="index.html">Home</a>
<button id="create" class="link" style="background-color: white" onclick="createContact()">Create contact</button>
<script>
const element = document.getElementById('home');
console.log(element.getAttribute('id')); // home
console.log(element.getAttribute('class')); // link
console.log(element.getAttribute('href')); // index.html
</script>
</body>
Attributes of an element are usually also available as properties with the same name, however the attribute “class” is an exception. This attribute can be accessed via the className property.
 console.log(element.id);           // home
 console.log(element.className);    // link
 console.log(element.href);         // index.html
The attributes id and href can be read via the properties of the same name, the attribute class via the property className.
It should be noted, however, that with two attributes, access via the getAttribute() method returns a different return value than direct access via the property. For the style attribute, the getAttribute() method only returns the text that the attribute contains as a value. Access via the style property, on the other hand, returns an object of the type CSSStyleDeclaration, which can be used to access the corresponding CSS information in detail. In addition, all attributes that are used to define event handlers return the JavaScript code to be executed as a function object via the corresponding property (e.g. onclick). However, if you access the respective attribute via the getAttribute() method, the name of the function to be executed is returned as text.
Complete Code - Examples/Part_273/...
 <body>
   <a id="home" class="link" href="index.html">Home</a>
   <button id="create" class="link" style="background-color: white" onclick="createContact()">Create contact</button>
   <script>
     const button = document.getElementById('create');
     console.log(button.onclick);                        // Output of the function
     console.log(typeof button.onclick);                 // Output: function
     console.log(button.getAttribute('onclick'));        // createContact()
     console.log(typeof button.getAttribute('onclick')); // Output: string
     console.log(button.style);                          // Output of the CSSStyleDeclaration
     console.log(typeof button.style);                   // Output: object
     console.log(button.getAttribute('style'));          // background-color: white
     console.log(typeof button.getAttribute('style'));   // Output: string
   </script>
 </body>
Here is an HTML button with various attributes, including a style attribute and an onclick attribute. The reason why direct access to event handler attributes such as onclick does not return a character string but a function is that you can use this property to define event handlers for the respective element. In other words, you can assign function objects to this property. The reason why direct access to the style attribute does not return a character string is that the CSS information of the respective element can be accessed via this attribute.
5.2. Change the value of an attribute or add a new attribute
To change the value of an attribute or add a new attribute, the setAttribute() method is used on the element. This expects two parameters, the name of the attribute and the new value. If the element already has an attribute with the same name, the value is overwritten with the new value. However, if the attribute does not yet exist, a new one is added to the element.
Complete Code - Examples/Part_274/...
<body>
<a id="home" class="link" href="index.html">Home</a>
<script>
const element = document.getElementById('home');
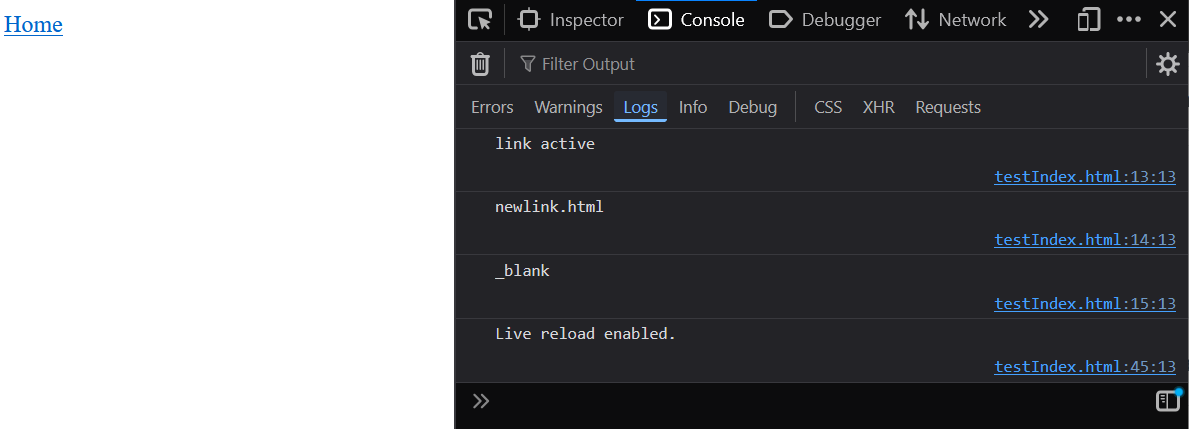
element.setAttribute('class', 'link active');
element.setAttribute('href', 'newlink.html');
element.setAttribute('target', '_blank');
console.log(element.getAttribute('class')); // link active
console.log(element.getAttribute('href')); // newlink.html
console.log(element.getAttribute('target')); // _blank
</script>
</body>
Here, the properties class, href and target are changed for the previously selected link element.
Alternatively, the values of attributes can also be changed or new ones added via the object properties of the same name:
Complete Code - Examples/Part_274/...
<body>
<a id="home" class="link" href="index.html">Home</a>
<script>
const element = document.getElementById('home');
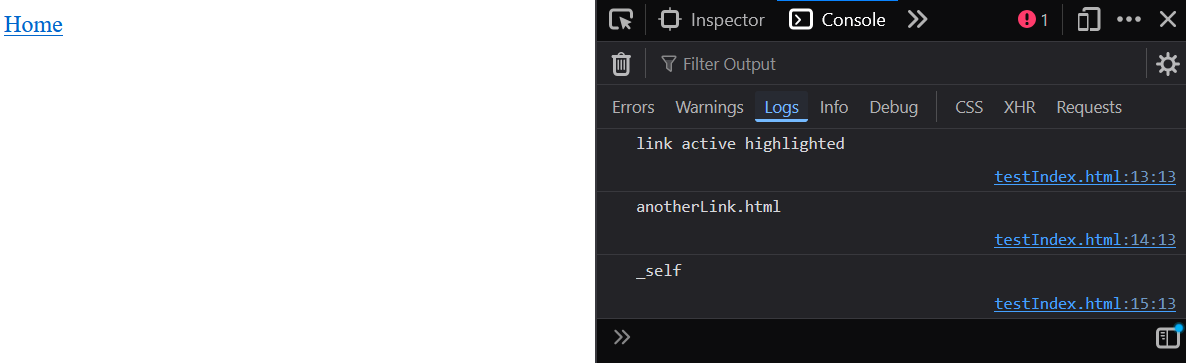
element.className = 'link active highlighted';
element.href = 'anotherLink.html';
element.target = '_self';
console.log(element.getAttribute('class')); // link active highlighted
console.log(element.getAttribute('href')); // anotherLink.html
console.log(element.getAttribute('target')); // _self
</script>
</body>
When the setAttribute() method is used, an attribute node is created in the background and added to the DOM tree at the corresponding element node as a child node.
5.3. Create and add attribute nodes
Attributes can also be created as attribute nodes using a special method, the createAttribute() method. This method expects the name of the attribute to be created as an argument and returns the new attribute node as the return value. However, this is not yet built directly into the DOM tree. This must be done manually using the setAttributeNode() method on the corresponding element.
Complete Code - Examples/Part_275/...
<body>
<a id="home" class="link" href="index.html">Home</a>
<script>
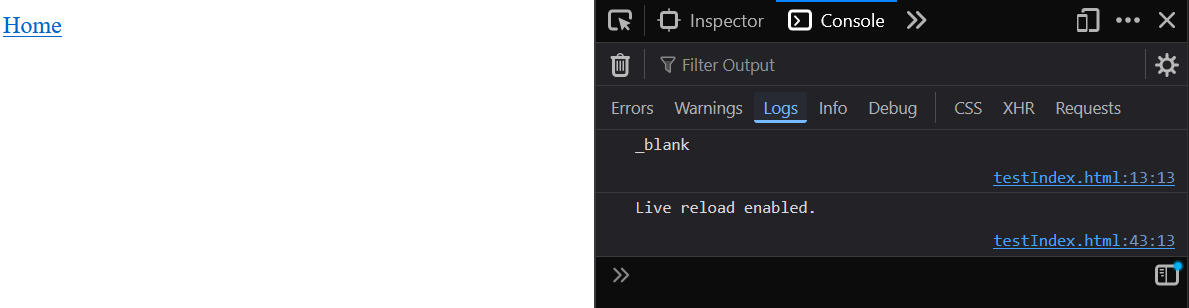
const element = document.getElementById('home');
const attribute = document.createAttribute('target');
attribute.value = '_blank';
element.setAttributeNode(attribute);
console.log(element.getAttribute('target')); // _blank
</script>
</body>
5.4. Remove attributes
The attributes can be removed from an element again using the removeAttribute() method.
Complete Code - Examples/Part_276/...
<body>
<a id="home" class="link" href="index.html">Home</a>
<script>
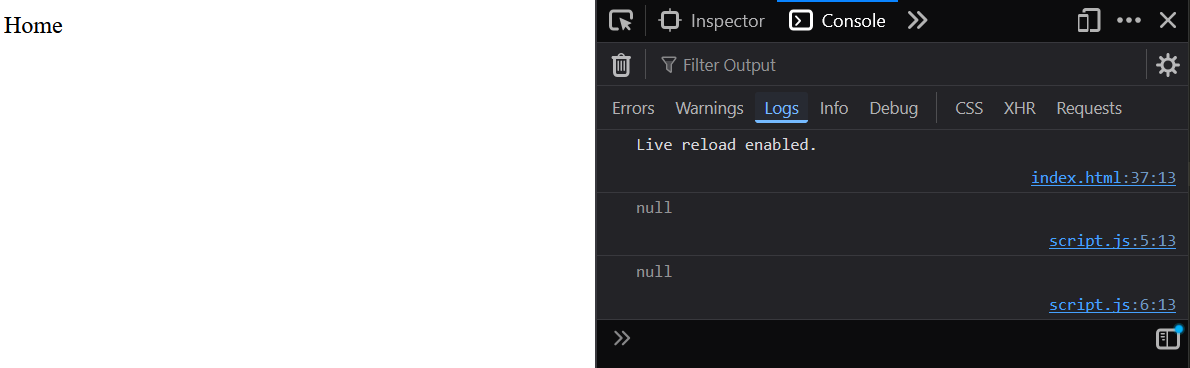
const element = document.getElementById('home');
element.removeAttribute('class');
element.removeAttribute('href');
console.log(element.getAttribute('class')); // null
console.log(element.getAttribute('href')); // null
</script>
</body>
Here, the two attributes class and href are removed from the link element with removeAttribute().
5.5. Access CSS classes
First of all, there is the className property, which every element on a website has. This property simply contains the value of the class attribute of the corresponding element as a string separated by spaces. Since version 4 of the DOM API, elements also have the classList property, which contains the CSS classes as a list:
- New CSS classes can be added to the list using the add() method.
- CSS classes can be removed from the list using the remove() method.
- The toggle() method can be used to toggle CSS classes, i.e. if the class exists in the list, it is deleted, but if it does not exist, it is added.
- The contains() method can also be used to check whether a CSS class is contained in the list.
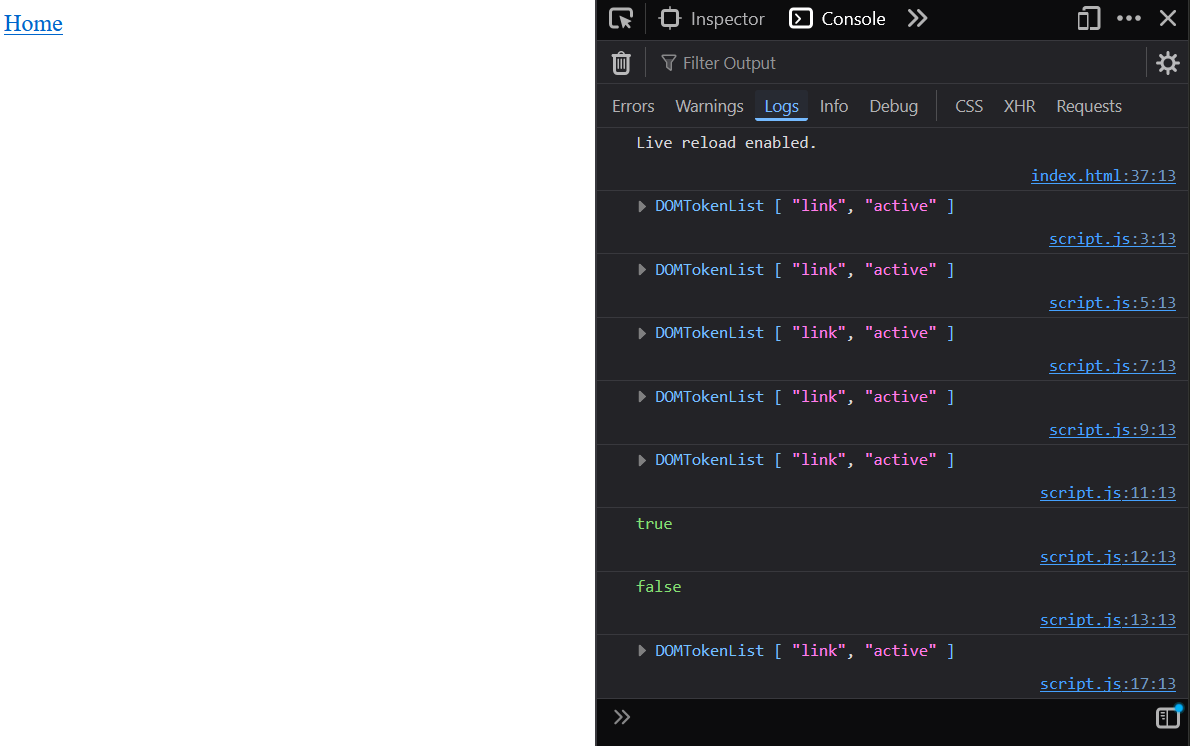
 <body>
   <a id="home" class="link" href="index.html">Home</a>
   <script>
     const element = document.getElementById('home');
     console.log(element.classList);                     // ["link"]
     element.classList.add('active');                    // Add class
     console.log(element.classList);                     // ["link", "active"]
     element.classList.remove('active');                 // Remove class
     console.log(element.classList);                     // ["link"]
     element.classList.toggle('active');                 // Toggle class
     console.log(element.classList);                     // ["link", "active"]
     element.classList.toggle('active');                 // Toggle class
     console.log(element.classList);                     // ["link"]
     console.log(element.classList.contains('link'));    // true
     console.log(element.classList.contains('active'));  // false
     let i = 5;
     const condition = i > 0;
     element.classList.toggle('active', condition);      // Toggle class
     console.log(element.classList);                     // ["link", "active"]
   </script>
 </body>
Related links: